Your bedroom deserves better than a bare wall behind your bed.
A headboard pulls the whole room together, and an upholstered one adds warmth, texture, and personality. The best part? You don’t need to spend hundreds to get one you love.
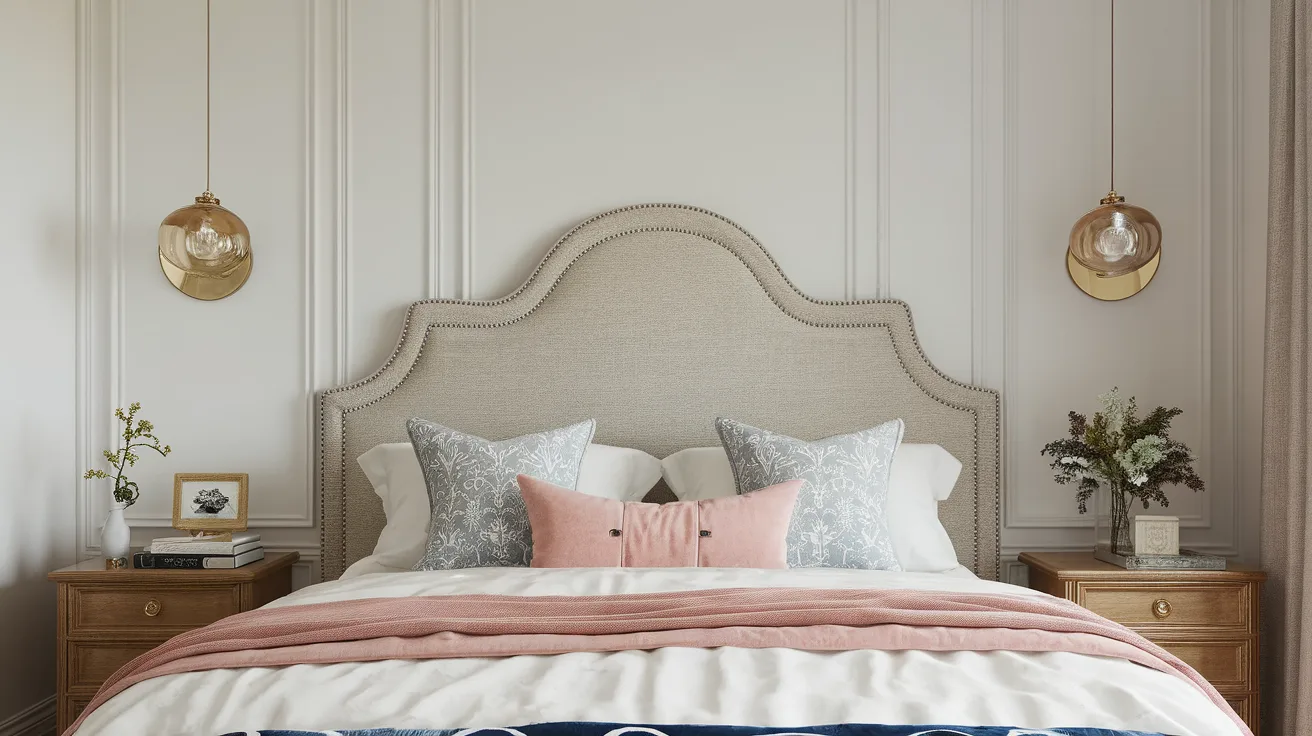
A DIY upholstered headboard is one of those projects that looks impressive but is surprisingly doable.
Whether you’re going for something sleek and minimal or soft and tufted, the process is mostly the same. A few materials, a free afternoon, and a little patience.
This guide walks you through everything from picking the right materials to mounting it on the wall. You’ll have a clear picture of exactly what to do and how to do it right.
Is a DIY Upholstered Headboard Worth It?
Thinking about building your own headboard? It’s a fair question, and the answer depends on a few things.
- When DIY makes sense vs buying: If you want something custom in a specific size, fabric, or style that stores don’t carry, DIY wins every time. It also makes sense when you want a high-end look without the high-end price tag.
- Budget vs time tradeoff: A store-bought upholstered headboard can run anywhere from $150 to $800+. A DIY version often costs under $80. But it does take a few hours of your weekend, so weigh that honestly if your time is tight.
- Skill level required: Good news. You don’t need to be a carpenter. If you can use a staple gun and follow a straight line, you’re ready. Most builds are beginner-friendly with a little patience.
Planning Your Headboard Before You Start

A little planning up front saves a lot of rework later. Before you buy a single material, make these key decisions clear.
1. Wall-Mounted vs Bed-Frame Attached vs Freestanding
- Wall-mounted headboards are secured directly to wall studs. They’re stable and work with any bed frame.
- Bed-frame attached headboards bolt onto the frame and are easy to move if you rearrange the room.
- Freestanding headboards use legs that sit behind the bed. A great option if you rent or prefer not to drill into walls.
2. Choosing the Right Height and Width for Your Bed
- Width should match your mattress size, or go 2 to 4 inches wider on each side for a fuller look.
- The standard headboard height is 14 to 28 inches above the mattress. Go taller for a dramatic feel, or shorter for a minimal feel.
- Always check your ceiling clearance before going tall.
3. Flat Panel vs Tufted vs Padded Grid Styles
- Flat panel is clean, modern, and the easiest to build. Great for beginners.
- Tufted is classic and elegant. It requires drilling and button work, but the result is worth it.
- Padded grid is structured and contemporary, with geometric sections stitched or stapled into a pattern.
Pick a style that suits your room, not just one that looks good in photos.
4. Placement and Visual Balance in the Room
Center the headboard behind the bed and align it with your bedside tables. If the wall is large, a taller or wider headboard keeps the proportions in check. Textured fabric also catches natural light well on a well-lit wall.
Tools and Materials That Actually Make a Difference
The materials you choose determine how your headboard looks, feels, and holds up over time. Get this part right and everything else becomes easier.
Materials
| Material | Best Option |
|---|---|
| Base Board | 3/4″ Plywood |
| Base Board (alt) | MDF |
| Foam | High-density, 2″ to 3″ thick |
| Fabric | Linen, velvet, faux leather, microfiber |
| Batting | Dacron polyester |
Tools
| Tool | Purpose |
|---|---|
| Measuring tape and pencil | Marking accurate dimensions on the board |
| Circular saw or jigsaw | Cutting the baseboard to size |
| Sandpaper (medium grit) | Smoothing cut edges before upholstering |
| Spray adhesive | Bonding foam securely to the board |
| Electric carving knife or utility knife | Trimming foam flush with board edges |
| Heavy-duty staple gun | Securing batting and fabric to the back |
| Staples (3/8″ to 1/2″) | Standard size for upholstery work |
| Scissors or fabric shears | Cutting fabric and batting cleanly |
| Upholstery needle and twine | Threading and securing tufting buttons |
| Drill | Making holes for tufting or mounting |
| Stud finder | Locating wall studs for a secure mount |
| Level | Keeping the headboard straight on the wall |
Choose materials with your lifestyle in mind. Pets, kids, and daily use all affect how long things last.
Step-by-Step: How to Make a DIY Upholstered Headboard
Once your materials are ready, the build is straightforward. Follow these steps in order for a clean, professional result.
Step 1: Measure and Cut the Base Board
- Measure your bed frame or mattress and cut the board to match. Add 4 to 6 inches on each side for a wider look.
- Standard height is 20 to 30 inches. Measure twice, then cut.
- Sand all edges smooth after cutting to prevent snagging fabric later.
Step 2: Attach Foam Padding
- Spray foam adhesive evenly on the board surface. Press the foam firmly and let it bond fully before moving on.
- Use an electric carving knife or sharp utility knife to trim foam flush with the board edges. Clean cuts make wrapping easier.
Step 3: Add Batting for Smooth Edges
- Lay batting over the foam and pull it around the edges to the back. This softens corners and removes harsh foam lines under fabric.
- Staple the batting to the back at 3- to 4-inch intervals. Keep tension even since too tight distorts the shape and too loose causes bunching.
Step 4: Upholster with Fabric
- Lay your fabric face-down on a flat surface. Place the board foam-side down in the center. Mark center points on all four sides to maintain alignment.
- Start stapling at the center of each side and work toward the corners. Pull the fabric taut but not stretched. Work opposite sides alternately to keep tension balanced.
- Fold corners neatly like gift wrap for the cleanest finish.
Step 5: Add Tufting (Optional)
- Use a ruler and chalk to mark evenly spaced grid points on the front of the fabric. Symmetry matters here, so measure carefully.
- Drill small holes at each marked point. Thread a long upholstery needle with strong twine, push it through from the back, loop it through the button shank, pull it tight, and tie it off securely at the back.
Step 6: Finish the Back
- Cut a piece of cardboard, thin plywood, or dust cover fabric to fit the back of the headboard.
- Staple or glue it neatly around the edges. This covers exposed staples and raw wood, giving the piece a finished look from the back.
Step 7: Mount or Attach the Headboard
- Wall mount: Use a French cleat or heavy-duty wall brackets. Find the studs and secure them firmly for the most stable result.
- Legs: Attach the furniture legs to the bottom corners, then slide the headboard behind the bed.
- Frame attachment: Use bolt-on headboard brackets that connect to standard bed frame slots for a quick, adjustable setup.
Video Tutorial
Special thanks to The Daily DIYer for providing valuable insights in their video, which I referenced while creating this guide.
Finishing Your Upholstered Headboard the Right Way
The difference between a headboard that looks homemade and one that looks store-bought usually comes down to finishing details.
Keeping Fabric Smooth and Wrinkle-Free
- Iron or steam your fabric before starting, since wrinkles set permanently once stapled
- Work on a flat, clean surface at all times
- Pull fabric in one direction at a time
- Use a fabric brush or lint roller once finished to lift surface texture
Stapling Evenly for a Strong Hold
- Use a heavy-duty staple gun since lightweight ones won’t grip well through batting and fabric
- Space staples 2 to 3 inches apart for consistent tension
- Keep at least half an inch of clearance from the edge
- Check for any loose or lifted staples before finishing
Aligning Tufting for a Balanced Look
- Mark every tuft point with a ruler since eyeballing leads to uneven spacing
- Use a level or grid template to keep rows straight
- Pull each button with equal tension so the fabric dimples uniformly
- Step back regularly to check alignment as you work
Common Problems of Upholstered Headboard

Even with careful work, small issues can come up. Here’s how to quickly sort the most common ones.
Wrinkled Fabric After Stapling
- Why it happens: Uneven tension or fabric not pulled taut enough before stapling.
- Fix it: Remove staples carefully with a flathead screwdriver, re-smooth the fabric, and re-staple section by section. Steam the surface gently afterward to relax remaining creases.
Buttons Coming Loose Over Time
- Why it happens: Twine wasn’t tied tightly enough, or the knot slipped.
- Fix it: Push a new threaded needle through the same hole from the back, re-thread the button, pull firm, and double-knot. Add a small washer on the back to stop the knot from pulling through.
Headboard Wobbling or Shifting
- Why it happens: Wall anchors missed the studs, or the legs aren’t level.
- Fix it: Use a stud finder and re-anchor for wall mounts. For leg-style headboards, add rubber floor pads to the bottom and push snugly against the bed frame.
Uneven Padding or Lumps
- Why it happens: Foam was trimmed unevenly or shifted before the adhesive set.
- Fix it: Lift the fabric carefully, peel back the batting, and trim or reposition the foam. For minor bumps, an extra layer of batting over the problem area usually smooths things out without a full redo.
Conclusion
A DIY upholstered headboard is one of the most rewarding bedroom upgrades you can make.
It’s affordable, customizable, and not as hard as it looks. Once it’s up, you’ll wonder why you waited this long.
Take it one step at a time. Pick your style, grab your materials, and start. Most people finish their first headboard in a single weekend.
If this guide helped, save it for when you’re ready to build. And if you’ve already made one, share how it turned out. Every project looks a little different, and that’s exactly the point.
Your perfect bedroom starts with one good idea. This might just be it.