Some gifts say I love you, but handmade ones whisper I made this thinking of you, and that feeling is truly irreplaceable.
While store shelves are full of pretty options, nothing quite compares to a little pair of hands pressing flowers into paper or painting something just for Mom.
DIY Mother’s Day crafts are having a serious moment right now, and honestly, for good reason. They’re sweet, budget-friendly, and carry the kind of meaning no price tag can replicate.
Cute, creative, and so personal, these ideas work beautifully for every age.
How to Choose the Right Mother’s Day Craft?
Picking the right craft makes all the difference between a fun afternoon and a frustrated one. Keep these in mind before you start:
- Match the craft to your child’s age, whether toddler, preschooler, or older kid, so it feels fun and not overwhelming.
- Check your time and materials beforehand so there are no last-minute supply runs.
- Go for easy if it’s their first time, and bump up to intermediate only when they’re ready for a little challenge.
- Add a personal touch like a name, photo, or handwritten message to make it truly one of a kind.
A little planning upfront means the focus stays where it belongs, on the making, the mess, and the memory.
Easy Crafts for Kids
These crafts are designed for little hands and big love. Simple, colorful, and genuinely fun to make together.
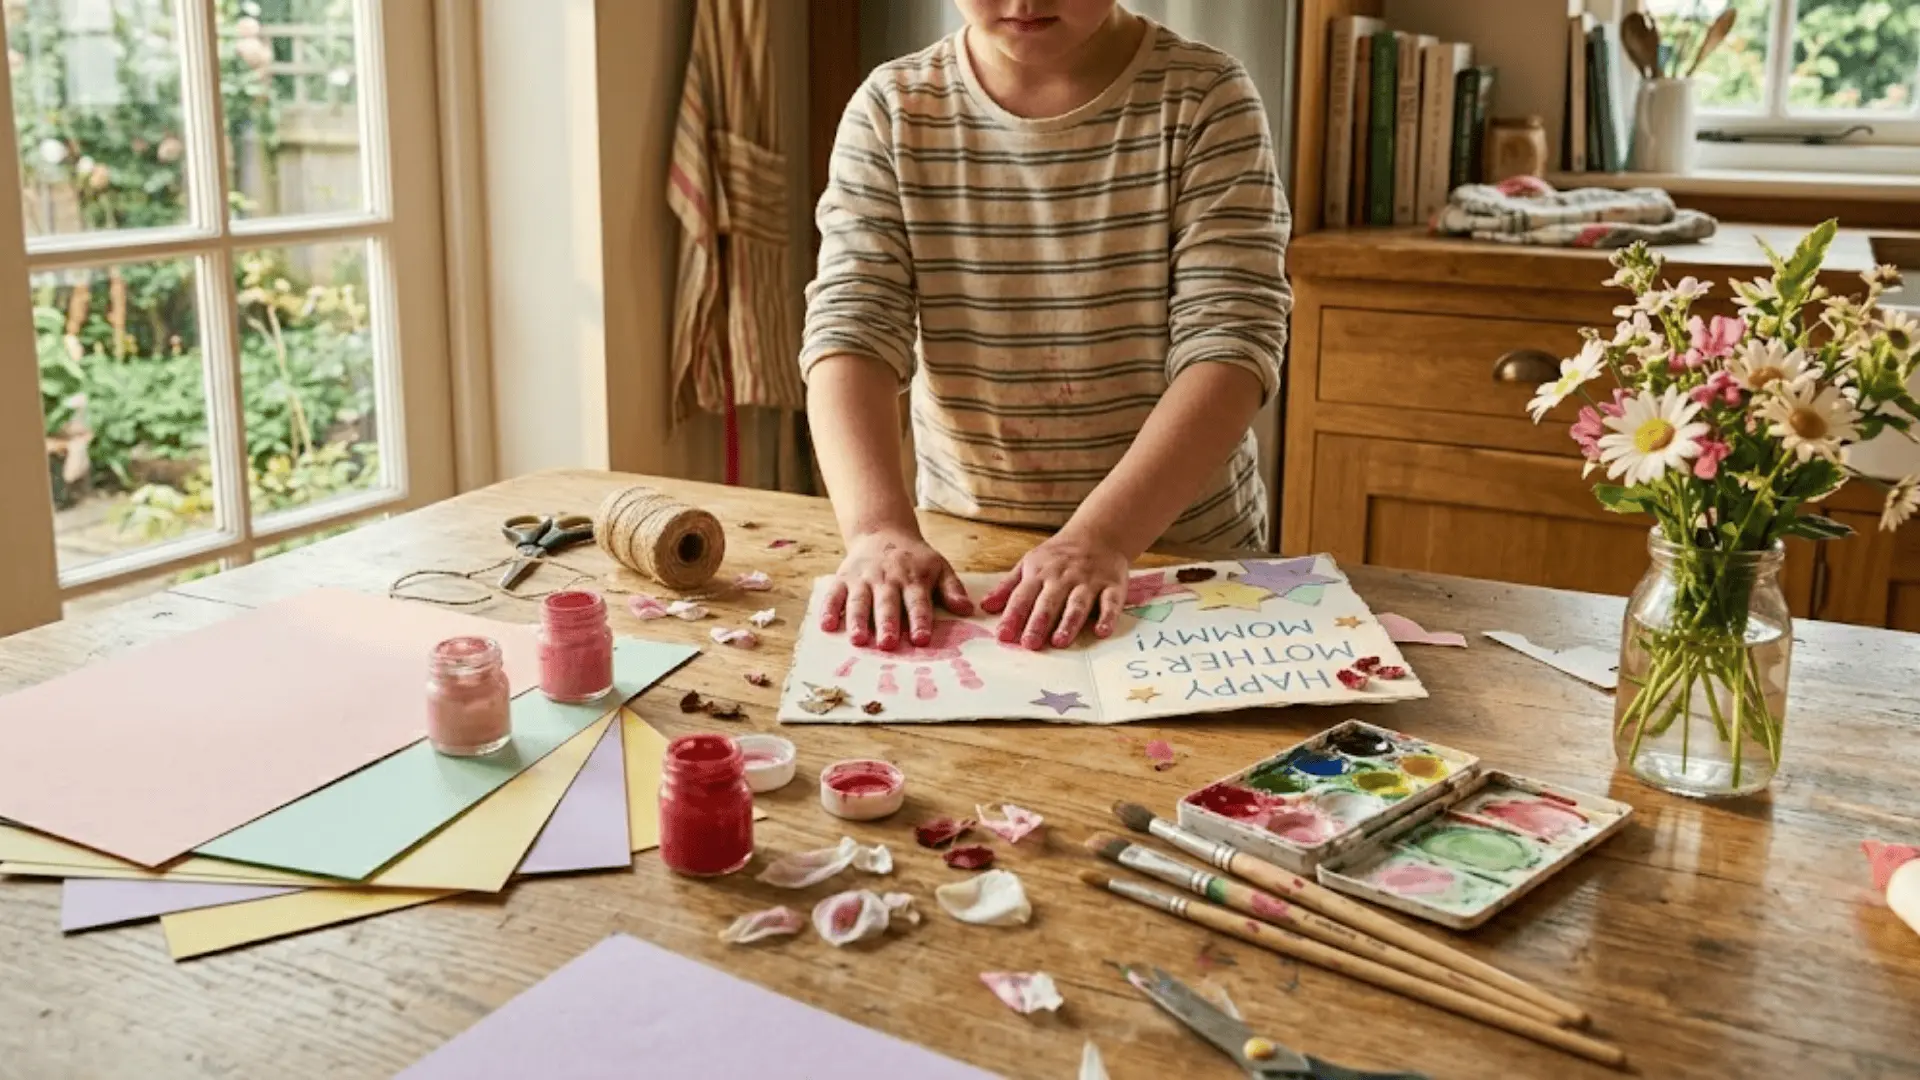
1. Handprint Flower Art
Time to Make: 20 minutes
Skill Level: Easy
A classic for a reason, handprint flower art turns something as simple as a painted palm into the prettiest keepsake. Kids absolutely love watching their handprint convert into a bloom Mom will want to frame.
- Step 1: Press your child’s hand into the paint and stamp it onto paper.
- Step 2: Let it dry, then flip it so fingers face down like petals.
- Step 3: Add a stem and leaves with a green marker or paint.
- Step 4: Write a sweet message at the bottom to finish it off.
2. Fingerprint Heart Card
Time to Make: 15 minutes
Skill Level: Easy
Tiny fingerprints, enormous meaning. This one is perfect for toddlers and preschoolers, and the result looks so intentional and sweet that you’d never guess how easy it actually is.
- Step 1: Fold a piece of cardstock in half to create your card base.
- Step 2: Use fingertips dipped in red or pink paint to dot a heart shape.
- Step 3: Let it dry completely before adding any writing.
- Step 4: Write a short, sweet message inside and sign it with love.
3. Paper Plate Flower Bouquet
Time to Make: 25 minutes
Skill Level: Easy
Who knew paper plates could look this good? This craft is budget-friendly, mess-friendly, and the finished bouquet genuinely looks like something you’d pick up at a craft fair.
- Step 1: Cut paper plates into flower shapes or petal rounds.
- Step 2: Paint each one in bright, cheerful colors and let them dry.
- Step 3: Attach a popsicle stick to the back of each flower as a stem.
- Step 4: Bundle them together with twine or a ribbon bow.
4. Popsicle Stick Photo Frame
Time to Make: 30 minutes
Skill Level: Easy
Simple materials, seriously charming results. A popsicle stick frame decorated by little hands and holding a favorite photo is the kind of gift that ends up on the fridge for years.
- Step 1: Glue four popsicle sticks together to form a square frame.
- Step 2: Paint or decorate with glitter, stickers, or washi tape.
- Step 3: Let it dry fully, then glue a favorite photo to the back.
- Step 4: Attach a small magnet or ribbon loop for display.
5. DIY “I Love You Mom” Card
Time to Make: 20 minutes
Skill Level: Easy
Sometimes the simplest words hit the hardest, especially when a child writes them by hand. This card lets kids pour their heart out in the most colorful, creative way possible.
- Step 1: Fold a piece of cardstock and decorate the front with doodles or stickers.
- Step 2: Write “I Love You Mom” in bold letters using markers or paint pens.
- Step 3: Fill the inside with reasons why Mom is the best.
- Step 4: Add small drawings or washi tape borders for that extra charm.
6. Painted Rock Messages
Time to Make: 30 minutes
Skill Level: Easy
Rocks might seem ordinary, but painted with love and a heartfelt word, they become the most unexpected little treasures. Mom can keep them on her desk, windowsill, or garden as a daily reminder.
- Step 1: Pick smooth, flat rocks and wash them clean.
- Step 2: Paint the base in a soft color like white, blush, or lavender.
- Step 3: Once dry, write a word or short message using a paint pen.
- Step 4: Seal with a clear coat to make the design last.
7. Paper Heart Garland
Time to Make: 25 minutes
Skill Level: Easy
Strung across a doorway or draped above her dresser, a paper heart garland turns any space into something that feels like a celebration. It is decorative, personal, and genuinely lovely.
- Step 1: Cut out hearts in varying sizes from colorful or patterned paper.
- Step 2: Decorate each heart with doodles, patterns, or little notes.
- Step 3: Punch a hole at the top of each heart and thread through twine.
- Step 4: Hang it across a shelf, doorway, or above Mom’s bed.
8. Cupcake Liner Flowers
Time to Make: 20 minutes
Skill Level: Easy
Cupcake liners are secretly one of the best craft supplies hiding in your kitchen. Layered and shaped just right, they make the fluffiest, most adorable paper flowers with almost zero effort.
- Step 1: Flatten and layer two or three cupcake liners of different sizes.
- Step 2: Pinch the center and twist slightly to form a flower shape.
- Step 3: Glue a button or paper circle to the middle as the bloom center.
- Step 4: Attach to a card, a gift tag, or a wrapped popsicle stick stem.
9. Crayon-Resist Art Card
Time to Make: 25 minutes
Skill Level: Easy
There is something genuinely magical about watching a hidden message appear under watercolor paint. Kids go absolutely wild for this one, and Mom will love the story behind how it was made.
- Step 1: Draw a design or write a message on cardstock using a white crayon.
- Step 2: Brush watercolor paint lightly over the entire surface.
- Step 3: Watch the hidden design magically appear as the paint dries.
- Step 4: Fold into a card and add a handwritten note inside.
10. Thumbprint Tree Artwork
Time to Make: 30 minutes
Skill Level: Easy
Every little thumbprint becomes a blossom, and together they create something that looks like it belongs in a frame. This one grows more meaningful every year you look back at it.
- Step 1: Draw or paint a simple tree trunk and bare branches on paper.
- Step 2: Dip thumbs into pink, red, or purple paint for the blossoms.
- Step 3: Press thumbprints all over the branches to fill the tree with blooms.
- Step 4: Let it dry, frame it, and gift it as a keepsake piece.
DIY Cards & Paper Crafts
When it comes to heartfelt gifting, a beautifully crafted card can say everything. These paper crafts are as pretty to make as they are to receive.
11. Pop-Up Mother’s Day Card
Time to Make: 35 minutes
Skill Level: Intermediate
A pop-up card takes the classic greeting card and gives it a moment of pure delight. The look on Mom’s face when something blooms right out of the page makes every extra fold completely worth it.
- Step 1: Fold a piece of cardstock and cut two small slits near the center fold.
- Step 2: Push the cut section inward to create a pop-up platform.
- Step 3: Glue a small flower, heart, or message onto the pop-up tab.
- Step 4: Decorate the front and write a loving note inside.
12. Accordion Fold Photo Card
Time to Make: 30 minutes
Skill Level: Easy
Part card, part photo album, this one is a beautiful way to capture a handful of favorite memories in one compact little gift. It fans open like a tiny storybook, and Mom will flip through it again and again.
- Step 1: Cut a long strip of cardstock and fold it back and forth like an accordion.
- Step 2: Attach a small photo or drawing to each folded panel.
- Step 3: Decorate the panels with captions, dates, or little doodles.
- Step 4: Glue the ends into a card cover so it fans out when opened.
13. Origami Flower Bouquet
Time to Make: 40 minutes
Skill Level: Intermediate
An origami bouquet never wilts, never needs water, and honestly looks stunning displayed in a small vase or tied with a ribbon. It is the kind of gift that feels both artistic and incredibly thoughtful.
- Step 1: Choose origami paper in soft florals, pastels, or patterned prints.
- Step 2: Fold each sheet into a classic tulip or lotus flower shape.
- Step 3: Attach each flower to a green paper or wire stem.
- Step 4: Bundle the stems together and tie with a ribbon for a full bouquet effect.
14. Watercolor Greeting Cards
Time to Make: 30 minutes
Skill Level: Easy
Soft washes of color bleeding into each other, a handwritten note at the center. Watercolor cards have that effortless, artistic quality that makes them look far more impressive than the effort they actually take.
- Step 1: Wet a piece of watercolor paper slightly with a damp brush.
- Step 2: Drop soft washes of pink, peach, or lavender across the surface.
- Step 3: Let the colors blend naturally and dry completely.
- Step 4: Add a handwritten message or stamped lettering once fully dry.
15. Scrapbook-Style Memory Card
Time to Make: 40 minutes
Skill Level: Easy
Equal parts card and keepsake, this one is layered with photos, patterns, and little written moments that tell a story. It is the kind of thing Mom tucks away safely instead of ever throwing out.
- Step 1: Start with a large folded cardstock base as your canvas.
- Step 2: Layer patterned paper, photos, stickers, and washi tape to fill the front.
- Step 3: Add small journaling strips with favorite memories or inside jokes.
- Step 4: Finish with a handwritten note tucked inside or written on the back.
16. Printable Coloring Cards
Time to Make: 20 minutes
Skill Level: Easy
Printable coloring cards are a wonderful option for younger kids who want to contribute something creative without needing a lot of guidance. Every crayon stroke makes it entirely, uniquely theirs.
- Step 1: Download or draw a simple floral or nature-themed card outline.
- Step 2: Print it onto cardstock and let kids color it in however they like.
- Step 3: Add their name, a date, or a short message once coloring is done.
- Step 4: Fold it into a card and pair it with a small handmade gift.
17. 3D Layered Paper Flowers
Time to Make: 45 minutes
Skill Level: Intermediate
These layered blooms have a sculptural quality that makes them look almost too pretty to be paper. Mounted on a card or framed on their own, they genuinely stop people in their tracks.
- Step 1: Cut flower shapes in three graduating sizes from cardstock or craft paper.
- Step 2: Curl the petals slightly by wrapping them around a pencil.
- Step 3: Layer them from largest to smallest and glue at the center.
- Step 4: Attach to a card front, a gift box, or frame it as wall art.
18. Envelope Surprise Card
Time to Make: 25 minutes
Skill Level: Easy
A beautifully decorated envelope already feels like a gift before it is even opened. Fill it with notes, photos, and a heartfelt letter, and it becomes one of those gifts that genuinely overwhelms Mom in the best way.
- Step 1: Decorate the outside of a plain envelope with florals, stamps, or paint.
- Step 2: Fill it with small notes, drawings, or printed photos.
- Step 3: Add a wax seal or sticker closure for a polished, gifted look.
- Step 4: Slip in a handwritten letter as the main surprise inside.
Personalized & Keepsake Crafts
These are the ones Mom will keep forever. Thoughtful, personalized, and made with so much love.
19. Memory Jar with Notes
Time to Make: 30 minutes
Skill Level: Easy
A jar filled with handwritten memories, compliments, and reasons she is loved is the kind of gift that gets pulled out on hard days and ordinary Tuesdays alike. Simple to make, impossible to forget.
- Step 1: Decorate a clean glass jar with ribbon, twine, or painted details.
- Step 2: Cut small strips of paper and write a memory, reason, or compliment on each.
- Step 3: Fold them up and fill the jar until it is overflowing with love notes.
- Step 4: Add a label or tag that reads “Open one whenever you need a smile.”
20. DIY Photo Frame with Decorations
Time to Make: 35 minutes
Skill Level: Easy
A store-bought frame holds a photo, but a handmade one holds a memory and a whole lot of heart. Decorated with personal touches, it becomes something she will want displayed somewhere she sees it every single day.
- Step 1: Start with a plain wooden or cardboard frame as your base.
- Step 2: Paint it in a color Mom loves or cover it with patterned paper.
- Step 3: Embellish with shells, buttons, dried flowers, or gems.
- Step 4: Slide in a favorite photo and let it dry before gifting.
21. Handwritten Recipe Book
Time to Make: 60 minutes
Skill Level: Easy
There is something deeply nostalgic about a recipe written out by hand, especially when it comes from someone she loves. Collect her favorites, add yours, and turn it into a little book she will reach for again and again.
- Step 1: Gather a small blank notebook or bind folded pages together yourself.
- Step 2: Write out family favorite recipes in your neatest handwriting.
- Step 3: Decorate each page with small illustrations, borders, or food doodles.
- Step 4: Add a dedication page at the front with a personal message to Mom.
22. Customized Candle Jar
Time to Make: 30 minutes
Skill Level: Easy
A candle is already a lovely gift, but one that has been decorated with her name, a quote she loves, or colors chosen just for her feels entirely different. Warm, personal, and genuinely beautiful on any shelf.
- Step 1: Clean a glass jar and let it dry completely before decorating.
- Step 2: Use glass paint, twine, or decoupage to personalize the outside.
- Step 3: Add a label with Mom’s name or a short quote she loves.
- Step 4: Place a tea light or small pillar candle inside to complete the gift.
23. Painted Mug with Message
Time to Make: 40 minutes
Skill Level: Easy
Every morning when she wraps her hands around this mug, she will think of you. A painted message or a simple design in her favorite colors turns an everyday object into something quietly special.
- Step 1: Wipe a plain white mug clean with rubbing alcohol so the paint sticks.
- Step 2: Use ceramic paint pens to write a message or draw a simple design.
- Step 3: Let it air dry, then bake in the oven per the paint instructions to set.
- Step 4: Wrap it up with a small packet of her favorite tea or coffee.
24. DIY Jewelry (Bracelet or Necklace)
Time to Make: 35 minutes
Skill Level: Intermediate
Handmade jewelry carries a tenderness that no store-bought piece can replicate. Whether it is a beaded bracelet in her favorite colors or a charm necklace with a personal touch, she will wear it with so much pride.
- Step 1: Choose beads, charms, or clay in colors and shapes Mom would love.
- Step 2: String them onto an elastic cord, chain, or wire in a pattern.
- Step 3: Add a meaningful charm like a heart, initial, or birthstone bead.
- Step 4: Tie or clasp the ends securely and present it in a small gift box.
25. Personalized Tote Bag
Time to Make: 40 minutes
Skill Level: Easy
A canvas tote she can actually use every day, decorated with something personal and made by hand, is both practical and deeply sweet. Groceries, books, farmers’ market finds, she will bring them everywhere.
- Step 1: Lay a plain canvas tote flat and place cardboard inside to prevent bleed-through.
- Step 2: Use fabric paint or markers to write a name, quote, or draw a design.
- Step 3: Add handprint stamps, flowers, or patterns around the main design.
- Step 4: Let it dry flat for several hours before folding or gifting.
Home Decor & Creative Crafts
Gifts that make her space feel even more like hers. These crafts are as beautiful to display as they are meaningful to receive.
26. Mason Jar Vase
Time to Make: 25 minutes
Skill Level: Easy
Humble and charming all at once, a decorated mason jar vase fits into any home and looks like it belongs there. Fill it with wildflowers, dried stems, or a single bloom, and it becomes a complete, beautiful gift.
- Step 1: Clean a mason jar and wrap the outside with twine, lace, or ribbon.
- Step 2: Paint the jar or add a decoupage layer of tissue paper for texture.
- Step 3: Let it dry, then fill it with fresh, dried, or faux flowers.
- Step 4: Tie a small gift tag around the neck of the jar with a sweet note.
27. DIY Wall Art with Quotes
Time to Make: 45 minutes
Skill Level: Easy
A quote she lives by, lettered beautifully by hand and framed with a little watercolor around it, is the kind of wall art that feels intentional and personal in a way nothing mass-produced ever could.
- Step 1: Choose a meaningful quote and sketch the layout lightly on canvas or cardstock.
- Step 2: Paint or letter the quote using acrylic paint or brush pens.
- Step 3: Add a watercolor wash, floral border, or painted background for depth.
- Step 4: Frame it or attach a ribbon loop to the back for easy hanging.
28. Flower Pot Painting
Time to Make: 35 minutes
Skill Level: Easy
A painted pot with her name, a pattern she loves, or a cheerful design makes even the most ordinary windowsill plant feel like a curated little corner. Pair it with a herb or succulent for a gift that keeps growing.
- Step 1: Clean a terracotta pot and let it dry before you start painting.
- Step 2: Paint the base in a soft neutral or pastel color as your background.
- Step 3: Add designs, patterns, or Mom’s name using a fine-tip paint pen.
- Step 4: Seal with an outdoor varnish and plant a small herb or succulent inside.
29. Decorative Candle Holder
Time to Make: 30 minutes
Skill Level: Easy
When the light flickers through tissue paper and dried petals pressed against glass, it creates the most beautiful warm glow. This one looks far more intricate than it actually is, which is always a good thing.
- Step 1: Start with a clean glass or jar and apply a thin layer of Mod Podge outside.
- Step 2: Press tissue paper, dried petals, or colored paper pieces onto the surface.
- Step 3: Smooth over another layer of Mod Podge to seal everything in place.
- Step 4: Let it cure fully, then drop a tea light inside for a warm, glowing effect.
30. Fabric Flower Bouquet
Time to Make: 50 minutes
Skill Level: Intermediate
Fabric flowers have a softness and texture that paper just cannot replicate, and they last indefinitely. Made from scraps in her favorite colors, this bouquet feels like it was designed specifically for her.
- Step 1: Cut circles or petal shapes from fabric scraps in soft, coordinating colors.
- Step 2: Layer and pinch the fabric pieces together to form each flower bloom.
- Step 3: Secure the center with a button, bead, or stitch to hold the shape.
- Step 4: Attach each bloom to a wire stem and arrange into a full, lush bouquet.
31. Mini Indoor Plant Gift
Time to Make: 20 minutes
Skill Level: Easy
A little plant in a pot decorated by hand is the gift that keeps on giving, literally. Low-maintenance and endlessly charming, it sits on her shelf and grows alongside the memory of how it got there.
- Step 1: Choose a small, easy-care plant like a succulent, pothos, or peace lily.
- Step 2: Re-pot it into a painted or decorated pot made by hand.
- Step 3: Add a layer of decorative stones or moss on top of the soil.
- Step 4: Attach a handwritten care card and a gift tag with a personal note.
Budget-Friendly Craft Ideas
Making something beautiful does not have to cost much at all. Some of the most meaningful Mother’s Day crafts come together with things already sitting around the house, a few dollar-store finds, and a little creativity.
Here is a quick breakdown to help you craft smart without stretching the budget.
| Material | Where to Find It | What You Can Make |
|---|---|---|
| Old Newspapers & Magazines | Already at home | Collage cards, paper flowers, gift wrapping |
| Glass Jars & Bottles | Kitchen recycling | Candle holders, memory jars, vases |
| Cardboard & Cereal Boxes | Recycling bin | Photo frames, gift boxes, layered art |
| Fabric Scraps & Old Clothes | Craft drawer or closet | Fabric bouquets, tote bag decor, bookmarks |
| Buttons, Ribbons & Twine | Sewing kit or dollar store | Frame embellishments, card details, jar wrapping |
| Acrylic Paint & Brushes | Dollar store | Painted mugs, pots, rocks, and frames |
| Popsicle Sticks | Dollar store or craft bin | Photo frames, mini easels, gift tags |
| Tissue Paper & Cupcake Liners | Kitchen drawer | Paper flowers, card accents, gift stuffing |
| Printed Photos | Home printer | Memory cards, frames, scrapbook pages |
| Washi Tape & Stickers | Dollar store | Card borders, frame decor, envelope seals |
Common Mistakes to Avoid
A little heads-up can save a lot of frustration, especially when kids and craft supplies are involved. A little heads-up can save a lot of frustration, especially when kids and craft supplies are involved.
Keep these in mind before you get started:
- Skip overly complex crafts for younger kids as frustration sets in fast and takes the joy right out of it.
- Prep all materials beforehand so the creative flow does not get interrupted by a last-minute supply hunt.
- Resist the urge to over-decorate or over-engineer because the simplest ideas often turn out the most beautiful.
- Let go of perfect because wonky petals, smudged letters, and crooked frames are what make handmade gifts so genuinely irreplaceable.
- Do not rush the drying time since skipping this step is usually what turns a great craft into a smudgy, sticky mess at the finish line.
The whole point is to enjoy the process together. A little mess, a lot of laughter, and something made with real love will always mean more than anything flawless ever could.
That’s a Wrap
Mother’s Day crafts are really just love made visible, something to hold, display, and keep long after the day has passed.
A keepsake bouquet or a simple painted rock with a handwritten note, it all carries the same heart behind it.
The imperfect edges and the glitter that went everywhere are part of the story, and honestly, the best part of it.
Now it is your turn; drop a comment below and tell us which craft you are making this year!
Frequently Asked Questions (FAQs)
What Materials are Needed for DIY Mother’s Day Crafts?
Most crafts on this list come together with basics like cardstock, paint, glue, and a few decorative extras like ribbon or washi tape. A quick sweep of your craft drawer and a dollar-store run is usually all it takes to get fully stocked up.
Can Toddlers Make Mother’s Day Crafts?
Absolutely, some of the sweetest crafts on this list were made with toddlers in mind. Handprint art, fingerprint cards, and cupcake liner flowers are all perfectly manageable for little hands with just a little guidance.
What are Quick Last-Minute Mother’s Day Craft Ideas?
A painted rock, a watercolor greeting card, or a memory jar with handwritten notes can each be pulled together in under 30 minutes. Sometimes the quickest ideas end up being the ones she treasures most.