

Clutter piles up fast. One day, the garage holds the car. The next one holds everything but the car.
Learning how to build a storage shed fixes that problem for good. It gives tools, lawn equipment, and seasonal items a proper home.
Building a shed from scratch sounds intimidating, but it really is not.
This post walks through the full process, from choosing the right size to installing the last screw. And yes, how to build a wood shed is covered too for those who prefer a classic timber look.
Why Build a Storage Shed Instead of Buying One?
A pre-built shed from a big-box store costs between $1,500 and $6,000. Building a shed from scratch runs $500 to $2,500, depending on size and materials. That is a significant saving, and the quality is often better too.
Most homes are short on storage space, more than people even realize. A 10×12 shed handles a mower, lawn tools, and garden supplies without feeling cramped.
There is still wall space left for shelving, hooks, and racks, too. A store-bought shed rarely gives that kind of flexibility.
And for those who prefer timber over metal or vinyl, knowing how to build a wood shed opens up even more options for a stronger and better-looking finish.
Tools and Materials Required to Build a Storage Shed
| Category | Item | Quantity / Spec |
|---|---|---|
| Tools | Circular Saw | 1 |
| Drill and Bits | 1 set | |
| Framing Hammer | 1 | |
| Speed Square | 1 | |
| 4-Foot Level | 1 | |
| Tape Measure | 1 | |
| Chalk Line | 1 | |
| Materials | Lumber for Wall Framing | 18 pieces of 2x4x8 |
| Plywood for Floor | 6 sheets of ¾-inch | |
| OSB for Walls and Roof | 12 sheets | |
| Roofing Felt and Asphalt Shingles | As needed for 10×12 | |
| Base Material | Concrete blocks or compacted gravel | |
| Door Unit | 1 pre-hung door | |
| Fasteners | Exterior wood screws and 16d framing nails |
NOTE: Always buy 10% extra lumber. Boards warp, cuts go wrong, and running short on day two wastes a full morning.
Planning Notes:
- Have all tools ready before Day 1 to keep momentum going
- The same tool list works for both standard and wood shed builds
- Timber framing needs no extra tools beyond this list
- Renting a post-hole digger saves hours on post-foundation build
Partwise Step-By-Step Instructions on Building a Storage Shed
Building a storage shed gets a lot less scary once the work is broken down. Each stage has one job:-
Lay the foundation first. Frame the walls next. Put the roof on after that. Finish the outside last. Stick to that order, and the shed stays strong for years without major repairs.
1. Foundation Options
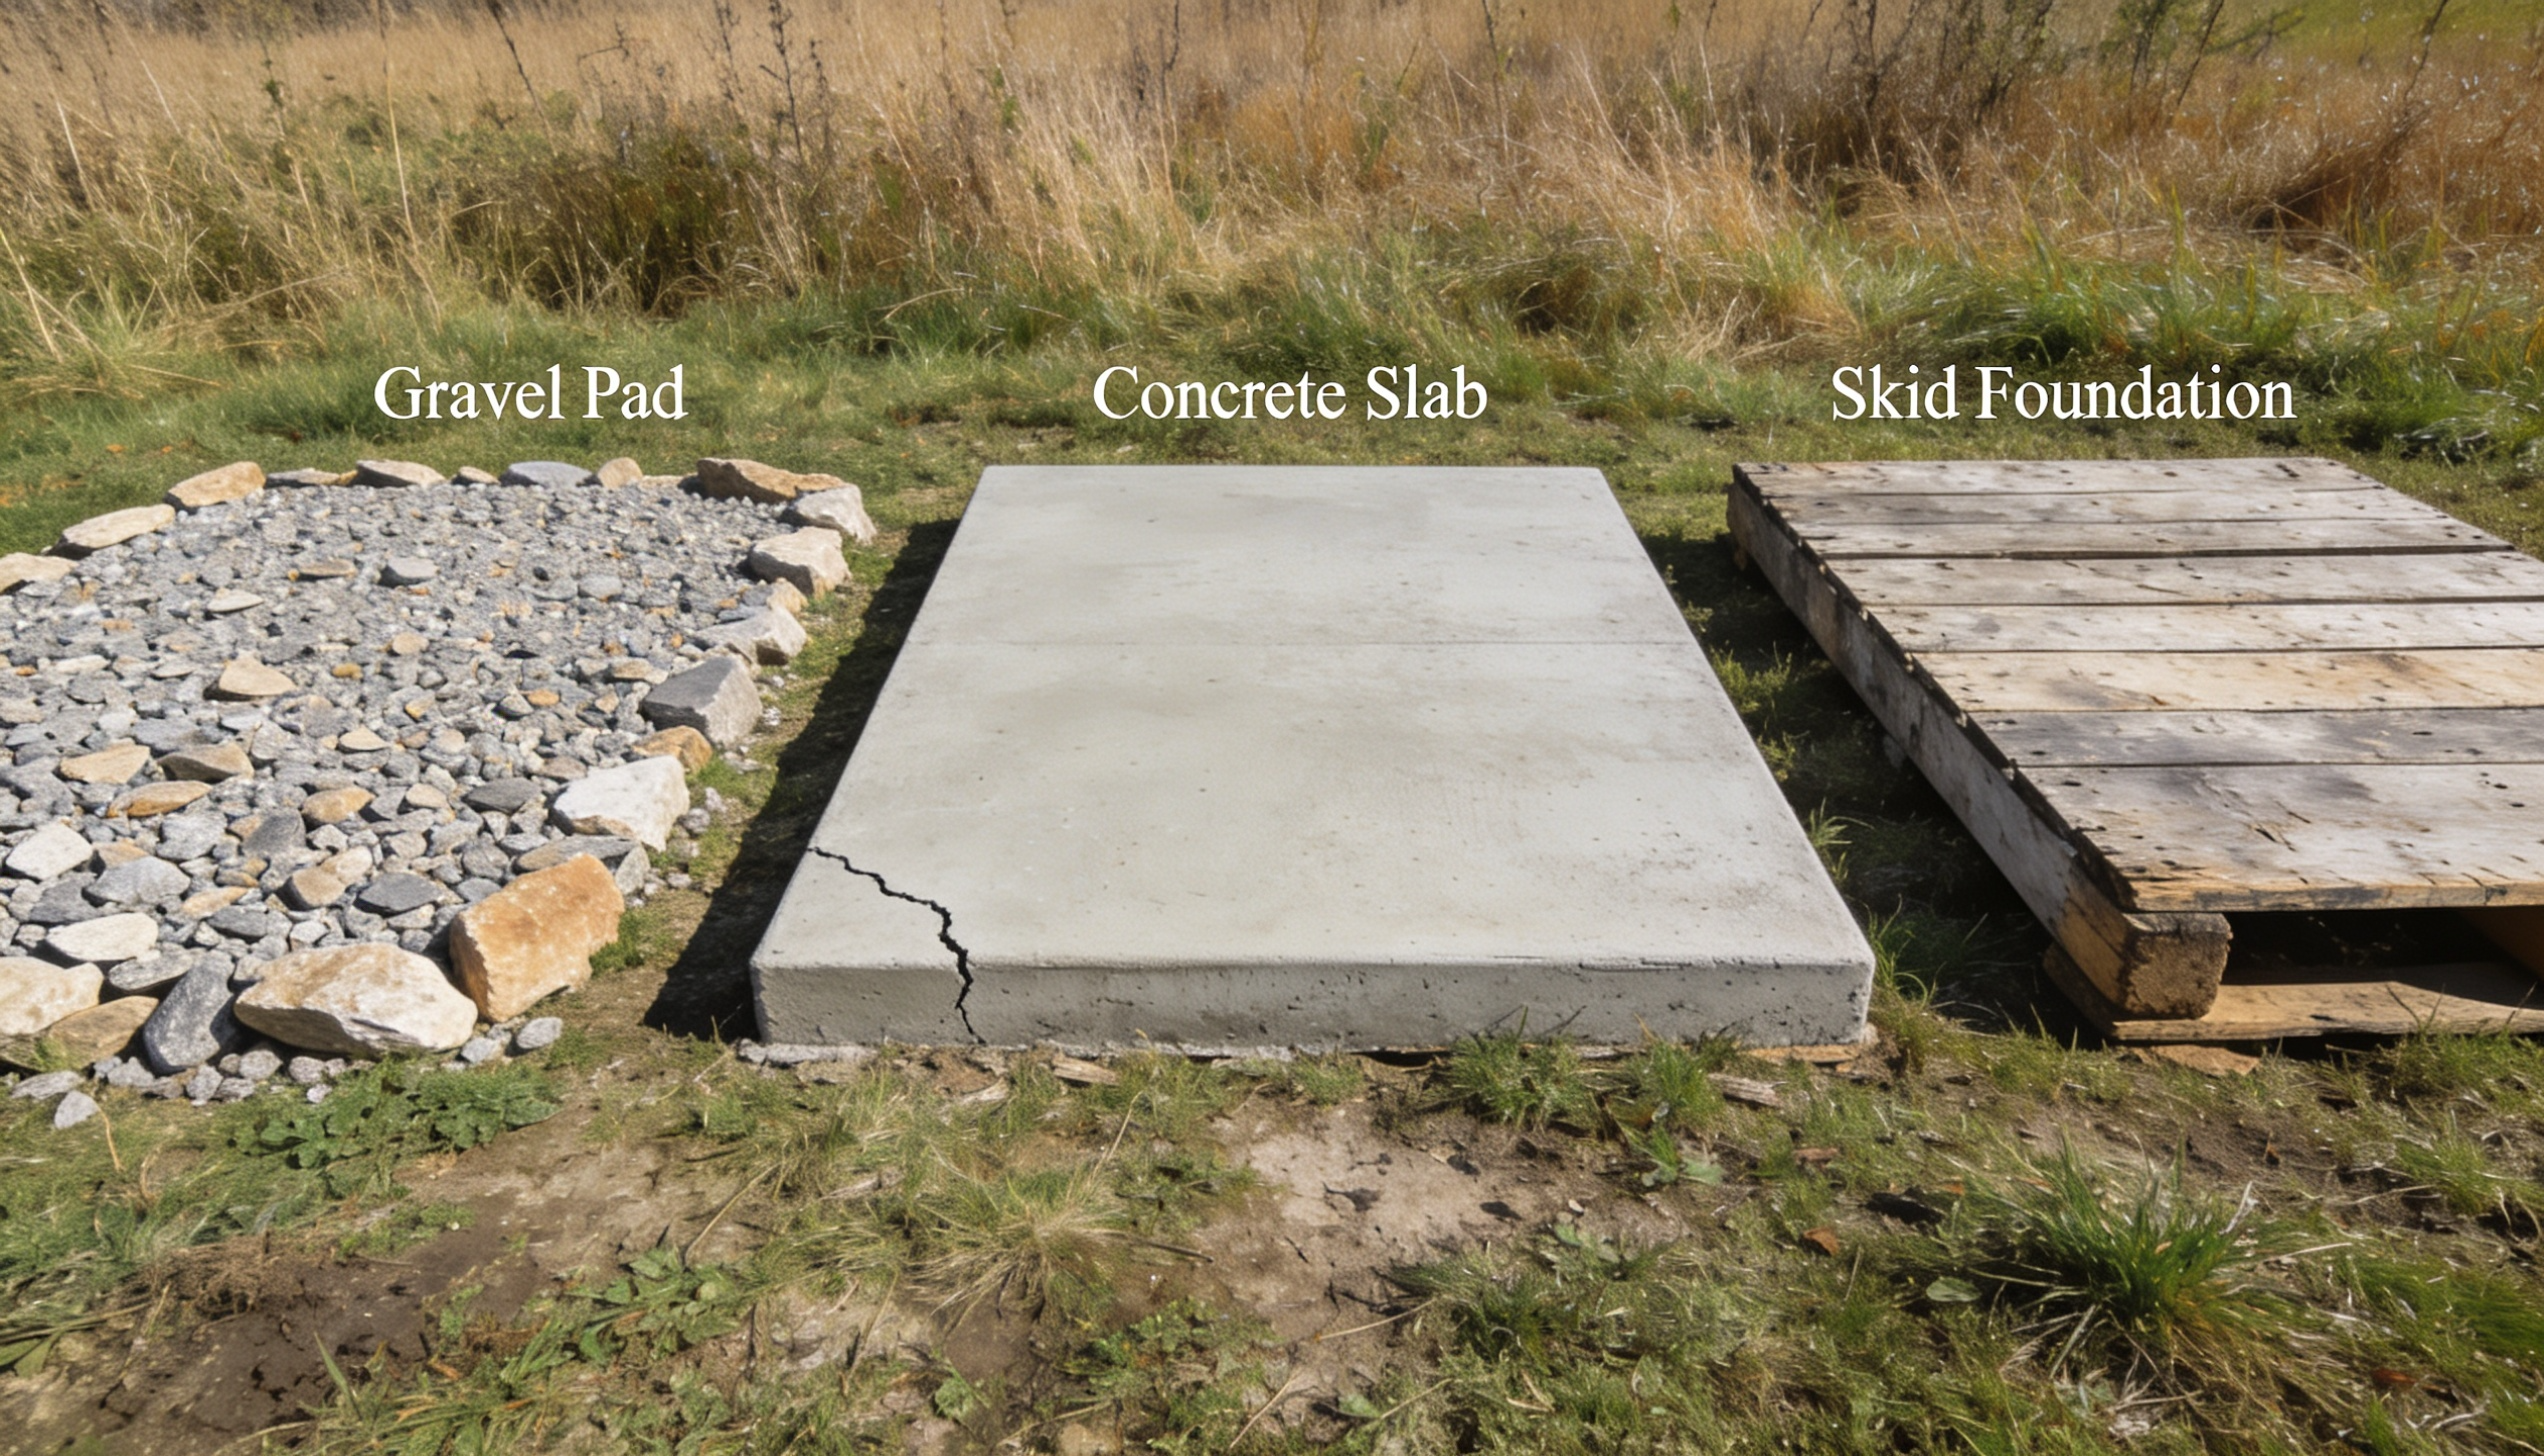
The foundation decides how long the shed built from scratch lasts. A bad base leads to a rotting floor, sticking doors, and walls that go out of square within a few seasons.
1. Gravel Pad:- Best for most DIY builders. It drains well and costs under $200 for a 10×12 area. No curing time needed.
2. Concrete Slab:- Best for heavy sheds or workshop setups. Costs more upfront, but it handles heavy equipment without shifting. Allow 28 days to fully cure before building on top.
3. Skid Foundation:- Best for flat ground and sheds that may need to be moved later. Lowest cost of the three options. Works well in areas without deep ground frost.
Check site drainage before laying the foundation. Water should flow away from the shed, not toward it.
- Walk the site after heavy rain. Look for puddles or low spots.
- If water collects in the area, raise the ground level with compacted gravel or soil before laying the base.
- Poor drainage rots the floor frame from the bottom up within a few seasons.
- The shed base should always sit slightly higher than the surrounding ground.
2. Floor Framing

A solid floor frame is what keeps the whole shed stiff and square. Skip corners here, and the problems show up in every stage that follows.
- Lay the two long rim joists flat on the foundation along the length of the shed.
- Cut 2×6 floor joists and space them 16 inches apart between the rim joists.
- Nail through the rim joists into each joist end, two nails per side.
- Measure corner to corner diagonally. Both numbers must match before moving on.
- Run construction adhesive along the tops of each joist, then lay the plywood sheets down.
- Screw the plywood with 2½-inch screws, every 8 inches along the edges and every 12 inches across the middle.
Walk the floor. It should feel solid with zero flex or bounce.
3. Framing the Walls

The following are the steps to Frame, Stand, and Brace Each Wall:-
- Cut the bottom plate, top plate, and studs for one wall at a time.
- Mark stud positions on both plates at 16 inches on center before nailing anything.
- Lay all pieces flat on the subfloor and nail through each plate into the stud ends — two nails per connection.
- For the door wall, frame the rough opening 2 inches wider and 1½ inches taller than the door unit.
- Build the door header from two 2×6 boards with a ½-inch plywood spacer sandwiched between them.
- Stand the longest wall first with two people. Tack a diagonal brace from the top corner to the floor.
- Nail the bottom plate to the subfloor every 16 inches.
- Connect adjacent walls at each corner with 3-inch screws.
- Check plumb on both faces of every corner before removing any temporary bracing.
4. Wall Sheathing Layout

Sheathing goes on before siding. It stiffens the walls and keeps the frame square.
- Start at the bottom corner of each wall and work across.
- Stagger the seams between sheets so no two vertical joints line up on the same stud.
- Keep sheathing flush with the bottom plate and tight around window and door openings.
- Nail every 6 inches along the edges and every 12 inches across the field.
5. Door Framing Details
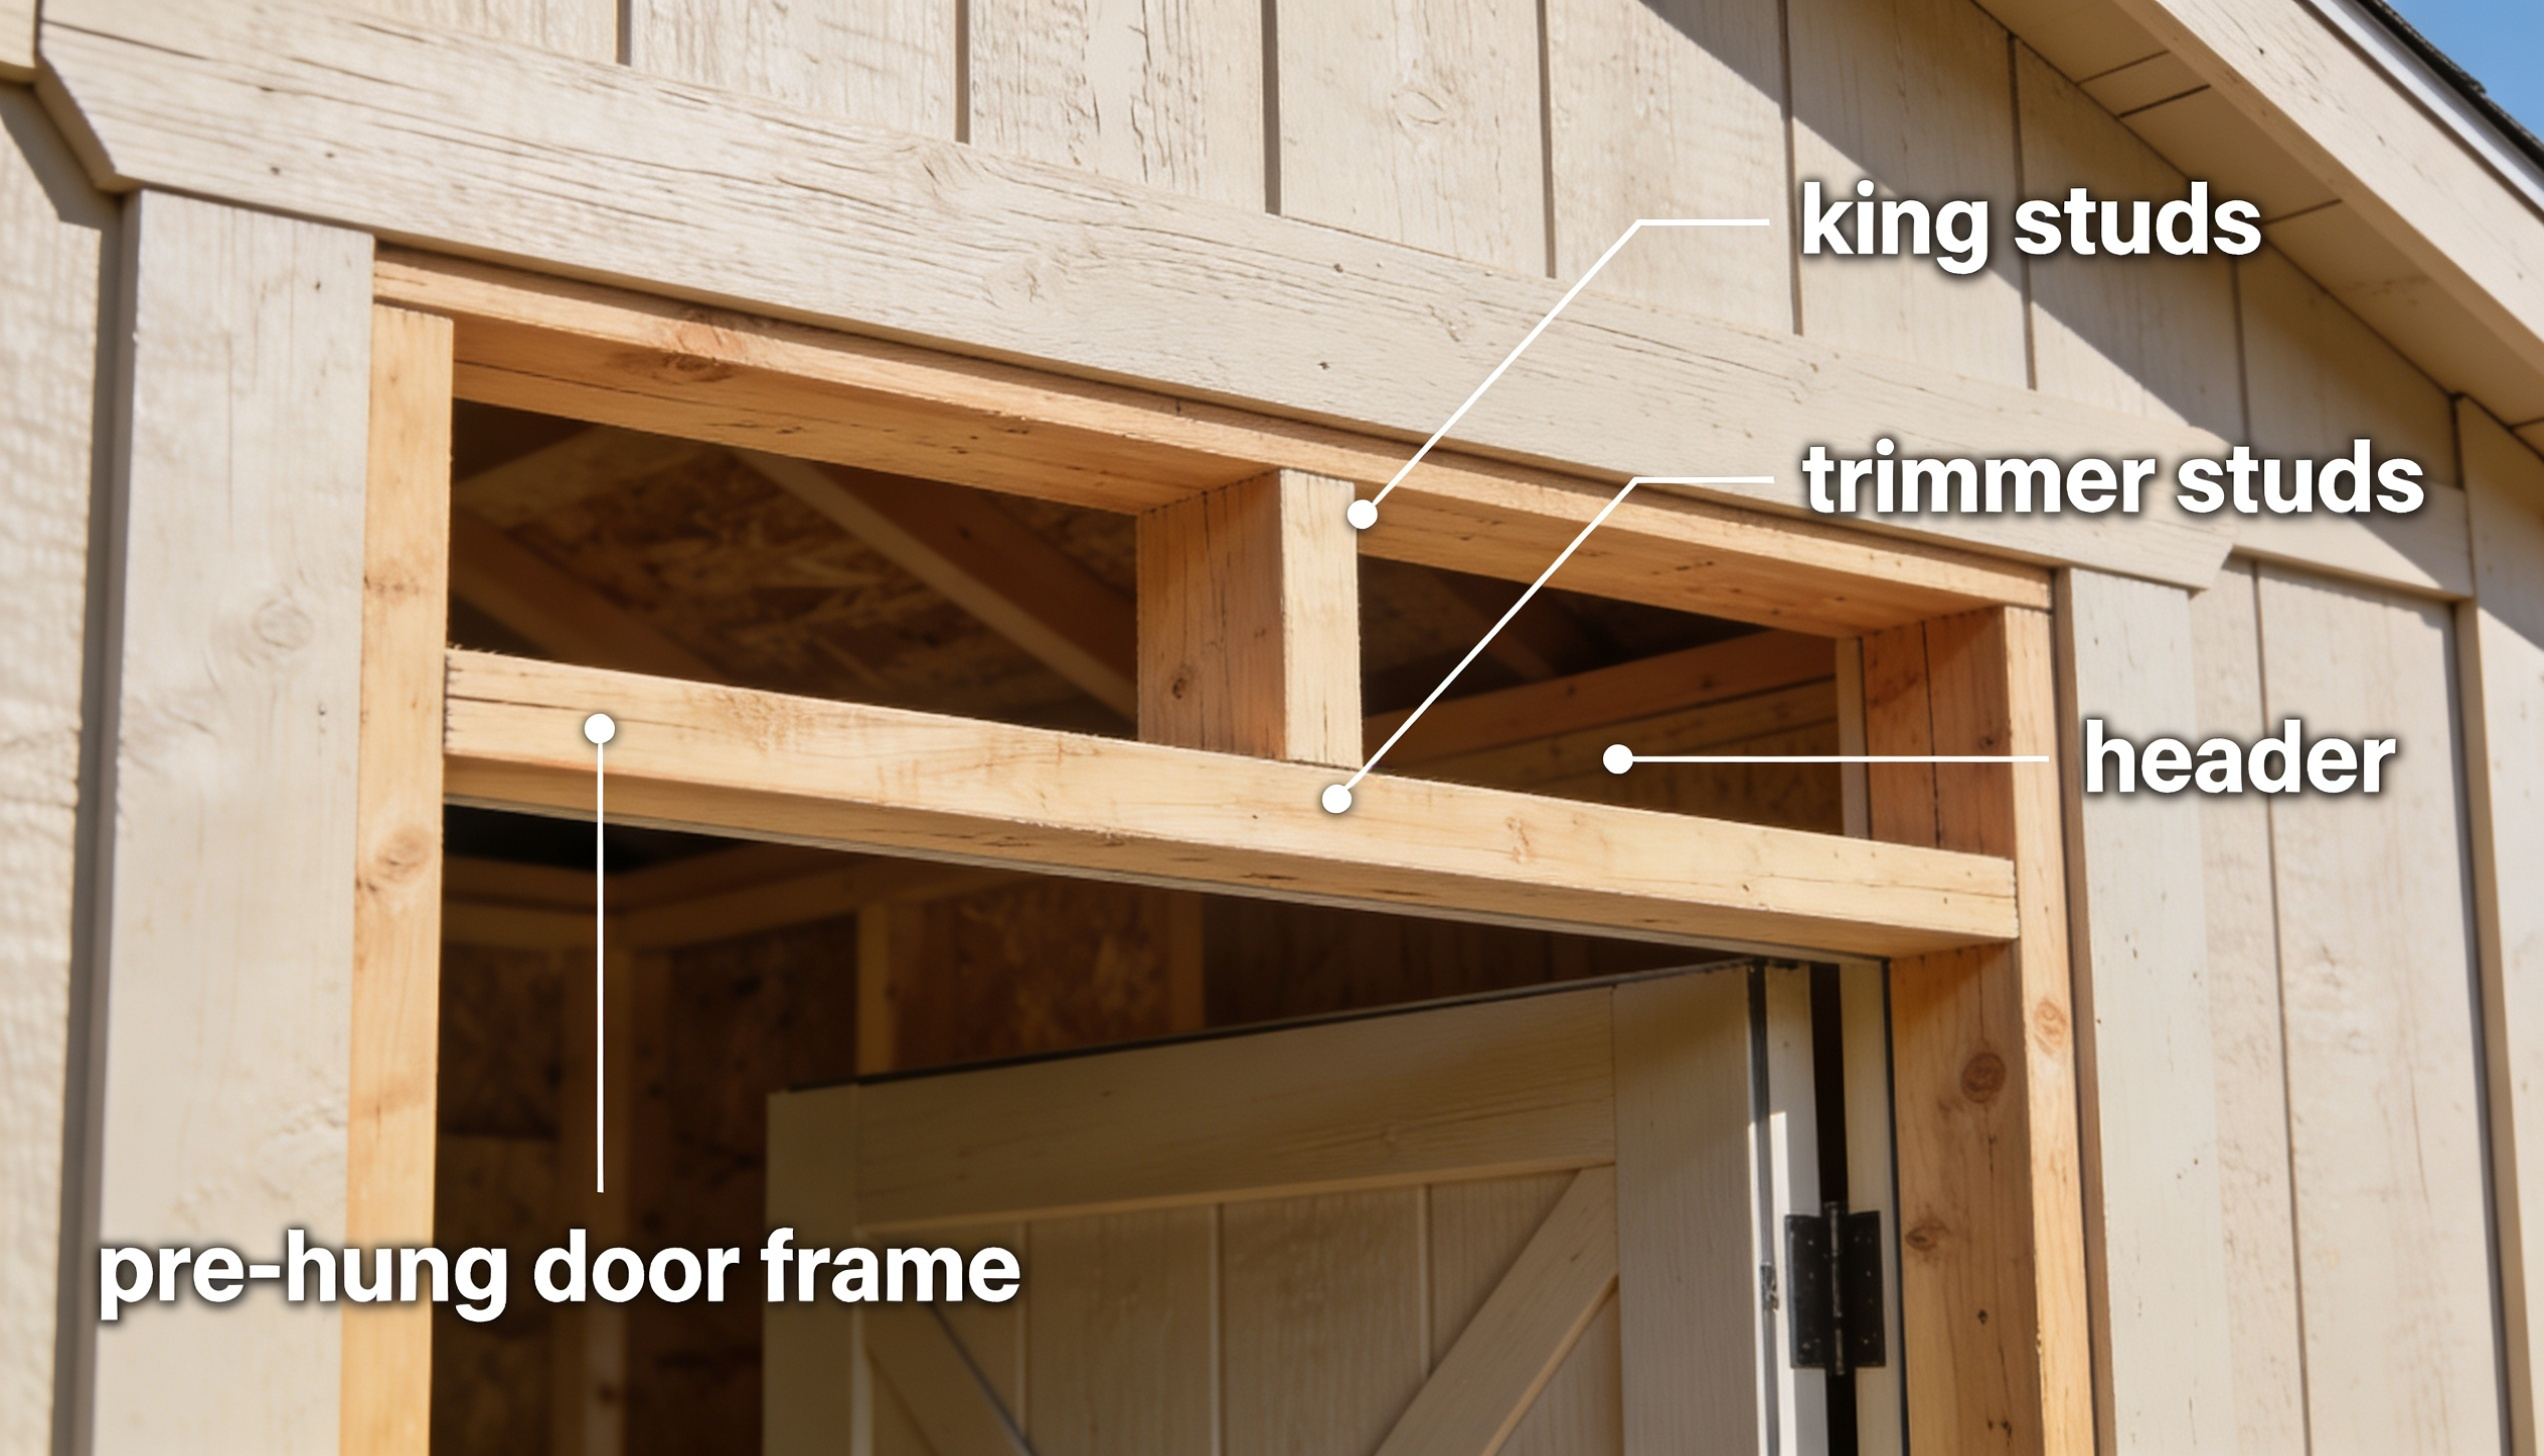
A correctly framed door opening saves hours of frustration later.
- The rough opening should be 2 inches wider and 1½ inches taller than the door unit.
- Install king studs on both sides first. Then add trimmer studs inside those to carry the header load.
- Build the header from two 2×6 boards with a ½-inch plywood spacer between them.
- Check the hinge side for plumb before nailing the door jamb in place.
6. Building the Roof
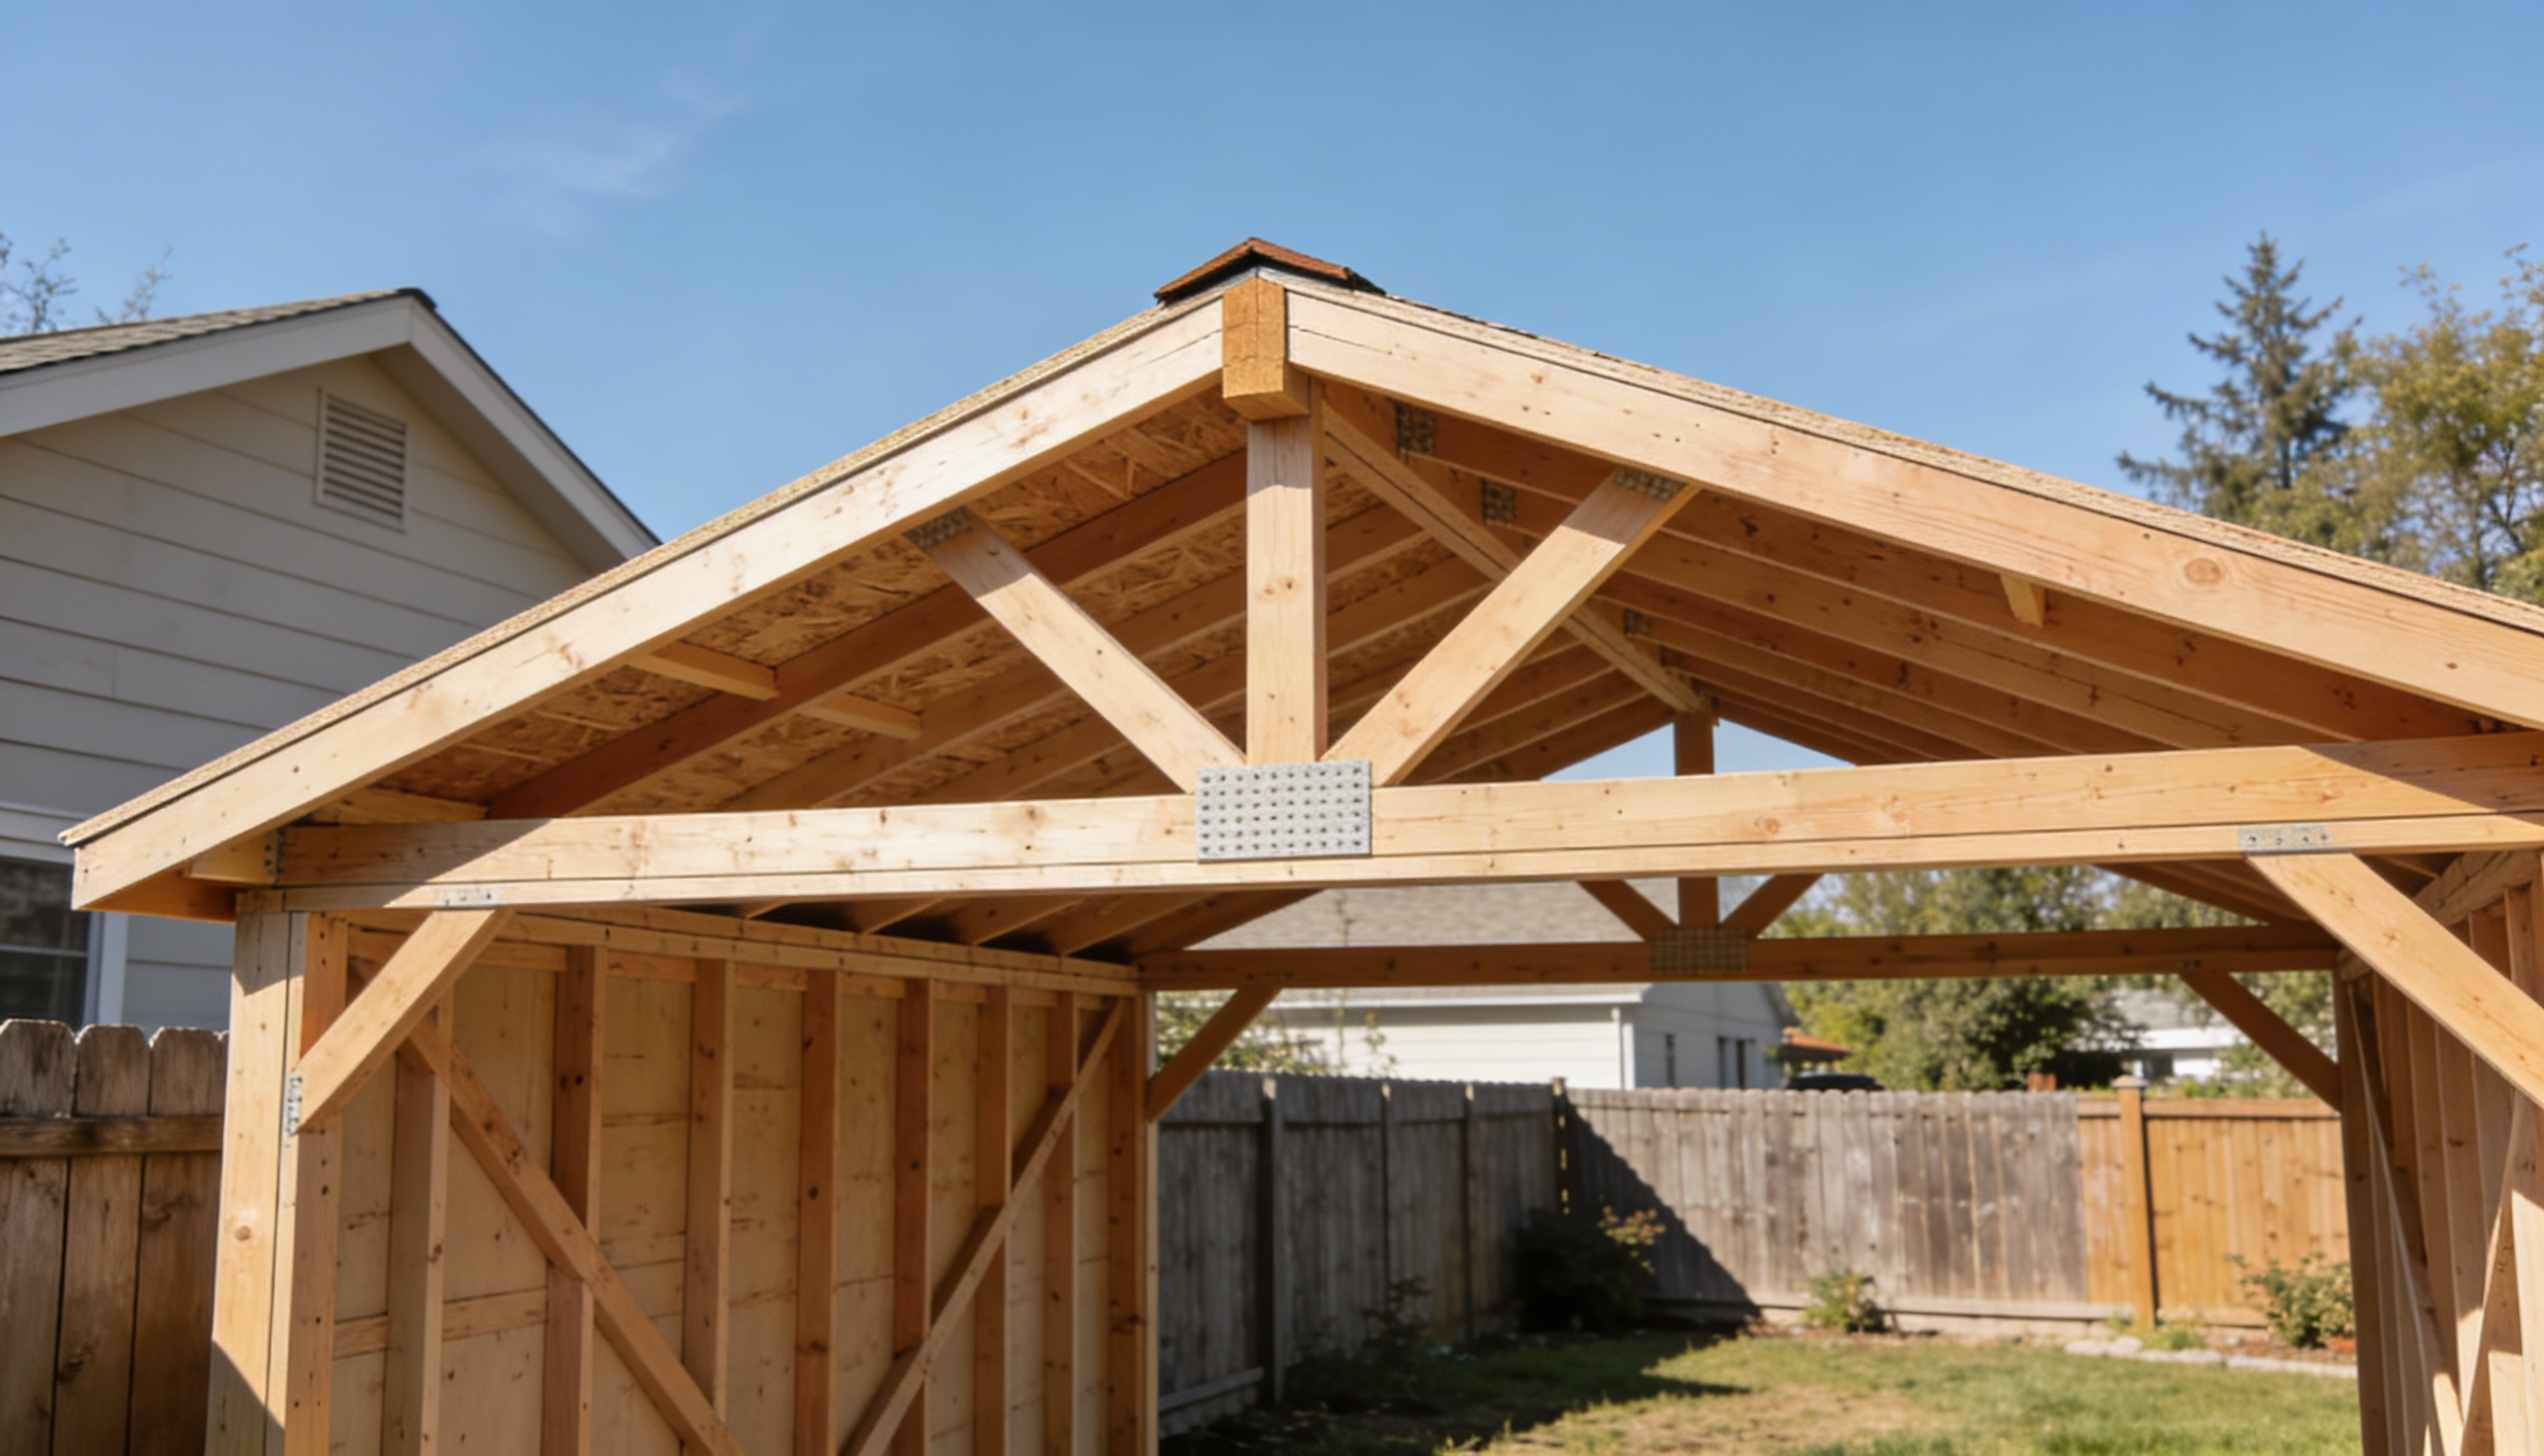
Building the roof starts with cutting rafters to a 4-in-12 pitch. Workers then add OSB sheathing, roofing felt, and shingles to complete a weather-tight cover.
Cutting Rafters:
- The roof rises 4 inches for every 12 inches across.
- Mark the cuts using a speed square.
- Cut one rafter, test the fit, then copy it for the rest.
Sheathing and Felt:
- Nail ½-inch OSB to the rafters from the bottom up.
- Stagger the sheet seams as you go.
- Staple roofing felt over the OSB, overlapping each row by 6 inches.
Shingles:
- Start at the bottom edge with a starter strip.
- Shift each new row by 6 inches so seams never line up.
- Nail each shingle with four nails above the adhesive strip.
- Finish the top ridge with cap shingles, overlapping each piece by half.
7. Roof Overhang and Drip Edge

The roof edge needs protection to prevent rainwater from running back into the walls.
- Let the roof sheathing extend 12 inches past the wall on all four sides.
- Nail metal drip edge along the eave before laying roofing felt.
- Nail the drip edge along the rake edges on top of the felt.
- This directs water away from the fascia and prevents rot at the top of the wall plate.
8. Ventilation

A shed with no airflow traps heat and moisture inside. Over time, that leads to mildew on walls, rust on tools, and rot in the wood framing.
- Install one soffit vent on each side of the roof overhang. This pulls fresh air in from the bottom.
- Add a ridge vent or a small gable vent at each end of the roof peak. Hot air naturally escapes through the top.
- Place vents on opposite sides of the shed so air moves across the full interior — not just one corner.
- For sheds used as workshops, add one louvered wall vent near the floor on the shaded side of the building.
- Keep vents clear of insulation, boxes, or shelving so airflow is never blocked.
- Two small vents are enough for a standard 10×12 shed. Larger sheds over 14 feet wide may need three or four.
Local Rules and Permits
Most homeowners skip this step and later regret it. Checking local rules before starting protects the build from being torn down or fined.
1. Permits: Most locales exempt sheds under 100-120 sq ft; larger ones typically require a building permit to ensure safety and code compliance. Check your zoning office early.
2. Setbacks: Structures must sit 3-10 ft (or more) from property lines, fences, and homes, varying by city/state/plot size to allow access and prevent hazards.
3. HOA Rules: Neighborhood associations often cap shed size (e.g., 80-120 sq ft), dictate colors/materials matching your home, and mandate prior approval to avoid removal fines.
4. Next Steps: Call/visit local zoning or submit online plans (site diagram, dimensions); processing takes days to weeks, preventing costly rework.
Common Mistakes to Avoid When Building a Storage Shed
Most failed DIY shed builds come down to the same four errors. Knowing them upfront saves a lot of time and money.
- Not checking the level on the foundation. Even a half-inch slope causes the floor frame to twist. Check the level in all four directions before laying a single board.
- Skipping the square check on the floor frame. If the floor is not square, nothing above it will be either. Measure the diagonals before fastening the subfloor.
- Using the wrong lumber near the ground. Regular lumber rots fast when it sits close to soil or moisture. Use pressure-treated wood rated for ground contact on all base components.
- Not pre-drilling near board ends. Driving a nail or screw too close to the end of a board without pre-drilling splits the wood and weakens the connection. Pre-drill anything within 2 inches of a board end.
Conclusion
Honestly, that is all there is to it. Building a storage shed is one of those things that sound harder than they actually are. A few weekends. Some basic tools. Materials from the nearest hardware store. That is it.
Get the foundation level. Get the floor square. Everything after that just clicks into place. Frame the walls. The roof goes on. Seal it up. Walk away with a shed that will last decades.
Building a storage shed from scratch doesn’t require a pro.
Frequently Asked Questions
What Is the Best Wood for A Storage Shed?
Pressure-treated lumber works best for the base and floor. Use standard pine or spruce for wall framing and roof rafters.
How to Keep Moisture out Of the Shed?
Lay a vapor barrier on the ground before the foundation. Keep the floor elevated and ensure proper roof overhang on all sides.
Can One Person Build a Shed Alone?
Yes, but standing walls is much easier with two people. Most solo builders take one extra day per stage compared to a two-person team.
How Does One Secure a Shed Against Strong Winds?
Anchor the base to the foundation using hurricane ties or anchor bolts. These connect the wall frames directly to the base and resist uplift.
How to Maintain a Storage Shed During the Rainy Season?
Keep the roof clear, seal small gaps, and check for leaks after heavy rain. Make sure water drains away from the base and store items off the floor.
