
The importance of the growth of kids’ minds in their holistic development is more crucial than anything, especially given the context of the contemporary ever-evolving society. Apart from the academic curriculum, it has now become essential to indulge them in art and craft-related activities to amplify their sense of liveliness.
And in the ocean of such possibilities, the craft through the ice cream sticks is best to be taken up. Its simple and versatile crafting technique is not just easy to create but holds immense potential to present various imaginative and artistic creations. Apart from that, it also makes kids inclined towards creativity and offers options to create new things with limited resources.
And the best part? Irrespective of the fact who wishes to create, it is quick and enjoyable to design without requiring any assistance and is perfectly suitable for kids. To make things much easier, we have presented 37 such ideas that are just perfect for your kids to get rolling to bring their imagination to life.
1. Bow and Arrow
![]()
Introduce your child to the working of a bow and arrow using popsicle sticks. Begin with a popsicle stick and soak it in water for about an hour for added flexibility. Once it has softened, bend it gently into a bow shape and tie a string or rubber band on its ends to hold the shape. For the arrow, you can use a Q-tip and remove one end of it. You can even use a straightened paper clip. Tie a feather at the other end to improve the arrow’s look.
2. Toy Raft

Craft a small raft using popsicle sticks to embark on a sailor’s journey. Start by laying out 10-12 popsicle sticks touching side-by-side. Glue two sticks perpendicularly across the top and bottom for a secured base. Allow it to dry, and elevate the design once dry by adding a sail. Create a sail by attaching a piece of paper or fabric in a triangular shape to a vertically placed stick in the center. Decorate it and enjoy floating it in a tub or basin with your kid.
3. Butterfly

Take your little one on a journey to Flutter Land with a popsicle stick butterfly. Start by placing 2 sticks in an ‘X’ form for wings and glue them at the center. For the body, you can use a colored stick or a regular painted one and place it vertically on top of the X. Decorate the wings with paints, glitters, and sequins symmetrically. Add a fun element to the butterfly by adding googly eyes and folded paper as antennae.
4. Popsicle Stick Basket

Create a cute miniature basket using popsicle sticks, which allows your kids to store tiny treasures or decorations. Create a square base using four sticks. Build the sides by layering and gluing sticks to make a woven appearance. Add a handle using two parallel sticks as handles by attaching them on opposite ends. Enhance the look by painting and weaving colored yarns across the handles.
5. Popsicle Stick Harmonica

Craft a playful harmonica with your kid using popsicle sticks and enjoy creating music. Take two popsicle sticks and place a small paper strip between them on one end. Secure the ends using rubber bands. Make sure that the paper is still able to vibrate. Place small pieces of folded paper between the sticks to create a gap for blowing air. Blow in the air to play the harmonica.
6. Christmas Ornaments

Add a personal touch to the festive tree by making popsicle stick Christmas ornaments with your kid. Arrange and glue three popsicle sticks in a star shape for a simple star and a triangle for a tree and paint it green while adding sequins for detailing. Attach a looped ribbon on the top for hanging. Allow your child to paint the tree using glitter and other decorative items to enhance its look.
7. Popsicle Stick Dolls

Allow your kid to unleash their creativity with popsicle stick dolls for imaginative play. Begin with a standard stick for the doll’s body. Paint or use markers to color the dolls and design facial features, outfits, and shoes. Glue on yarn or threads as hair while using small fabrics for clothing.
8. Sundial

Discover ancient time-telling with your child using a popsicle stick sundial. Start by creating a sturdy cardboard base and plant a popsicle stick vertically in the center. Place the sundial outdoors on a sunny day by using a compass to align it in the north. Mark the shadow’s tip every hour with a smaller popsicle stick. Label the time according to your zone, and voila, the sundial is now live to enhance the overall appeal.
9. Popsicle Stick Maze

Challenge little navigators with a popsicle stick maze. Start with a flat cardboard base while planning the maze’s path. Glue popsicle sticks vertically on the cardboard to form walls. Create a start and finish point and increase the difficulty with each level. Allow the glue to dry, and paint the sticks to improve the look. Use a marble or small ball for navigation.
10. Treasure Chest

Create a treasure chest for your little crafter with popsicle sticks. Lay sticks flat on a base and vertically for walls. For the hinged lid, glue sticks side by side with a bit of overlap for a curved shape. Paint in brown and gold with metallic details for hinges and latch. Line the interior with red velvet fabric once it is dry for a royal touch. Fill the chest with beads and coins or other stuff of your choice.
11. Dragonflies

Popsicle dragonflies are an ode to nature’s beauty. Start with creating a popsicle stick as the body. For wings, you can use thinner sticks or cut a regular one in half. Paint and decorate the body in vibrant colors, sparkling glitters, and sequins. Glue on tiny googly eyes and draw a smiley mouth for a funky touch. These can easily be used as fridge magnets as well.
12. Fairy Garden Fence

Brace yourself up to walk into an enchanted world with your little one with a stick fairy garden fence. Start by cutting popsicle sticks in half. Lay them side by side with a little gap in between. Use two uncut popsicle sticks across the top and bottom and glue them together. Paint the fence brown and decorate it with glitter and pastel hues.
13. Barnyard Animals

Turn popsicle sticks into delightful animals for your little one. Use the stick as the body and paint it white to create a sheep; add cotton balls to create the wool, black beads, or googly eyes. For a pig, you may also choose to paint the popsicle pink, with ovals as ears and a button for the snout. Chickens can be white and yellow, and orange triangles for beaks. Other animals can be created accordingly, as clearly depicted in the image above.
14. Snowflakes

Enjoy the winter’s magic by creating snowflakes using popsicle sticks. Start with three sticks on top of each other in a star shape. Glue them at the center. Add smaller stick segments at the edges. Once the structure is set, paint them in metallic silver and icy blues. Decorate with sequins and glitter to give it an authentic snowflake look. Attach a ribbon to hang them easily.
15. Door Signs

Welcome people alongside your creativity with a popsicle door sign. Align multiple sticks side by side and glue 2 sticks horizontally on the top and bottom. Paint the background color and write a welcome note using stencils, paints, or markers. Detail with glitter, stickers, or other decorative items. You can use ribbons or twine loops to hang it easily.
16. Airplanes

Ready for a takeoff? Design an airplane using popsicle sticks. Use one stick as the body, and use similar sticks and place them horizontally for the wings. Smaller sticks can be used at the tail for stabilizers. Paint the aircraft in bright colors and optionally add paper propellers for an authentic look, or you might even choose to keep it simple, as depicted in the image above.
17. Stick House

Create a cozy house with popsicle sticks. Lay them side by side to form the floor and walls. Arrange more sticks in an overlapping form to create the roof. Paint the house in bright colors to add a funky flair. Add more details like windows, chimneys, functional doors, front porch, and shutters. Secure everything with glue to complete the house.
18. Bird House

You can create a Birdhouse with the Popsicle sticks. Popsicles can be arranged into a square form to serve as the bird feeder’s base. To keep the form in place, stick the corners together using glue. To make a sloping roof, attach more popsicle sticks to the top of the foundation construction. This will aid in rainproofing the bird feed. Creating this bird feeder means making more than simply an item; it is making a small shelter for the nearby birds. It will also provide an opportunity to look closely at their beauty and behaviors.
19. Pen Holder

A pen holder using the popsicle sticks is a simple and enchanting idea. Place popsicle sticks next to one another to create a square or rectangle, gluing them as you go. Glue popsicles stick vertically along the base’s sides to create the walls. This will build the pen holder’s walls. If you desire a higher holder, you may increase the height by including more sticks. One can paint the popsicle sticks in your colors or even make a design with several tones. To add some flare, you can also use stickers, buttons, or other decorative objects.
20. Tic-Tac-toe Game Board

Enjoy the gaming experience by creating your own tic-tac-toe game. To Create these popsicle sticks, you should first arrange a 3*3 grid. To keep the grid in place, glue the intersecting points together. Choose which player will be X and which will be O for the markers. On the popsicle sticks, create Xs and Os with markers or paint. Ensure that they can be clearly distinguished. To make your game special, paint the popsicle sticks in vivid colors or add little embellishments like jewels or stickers.
21. Photo Album

To create the back and front covers of your album, start by placing popsicle sticks horizontally. Join them firmly with glue. For album binding, cut strips of cardstock or thick paper to the width of your covers. These strips should be positioned with the margins of the covering and given holes. Your album will be bound together using these tricks. For your photo pages, cut more cardstock or paper into smaller rectangles. Make sure they are snugly tucked in between the blankets. The number of pages in your album is up to you.
22. Mini Guitar

To make the body of your guitar, start by placing popsicle sticks vertically on an empty tissue box or a piece of cardboard. Place the sticks with glue and let them dry. To create the guitar’s neck, affix more popsicle sticks horizontally to the top of the body. Stretch the rubber bands over the guitar neck and fasten them at the top and bottom to form the strings. You’ll use these rubber bands as the strings for your guitar. You may experiment with various tones by using different sizes. A normal thread will also do the work for the guitar’s string, as shown in the image above.
23. Woven Basket

To create this, popsicle sticks should be placed side by side to form the basket’s foundation. To have the desired width, glue together two or three sticks. Your weaving will be built on top of this. Popsicle sticks should be affixed vertically to the base stick’s edges. You may weave over and under the vertical poles with a length of yarn or ribbon. Up until the base is completely covered, keep weaving in this manner. Use glue to fasten the ribbon or yarn to the vertical sticks as you weave. If extra vertical sticks are required to get the necessary height for your basket, you can do so.
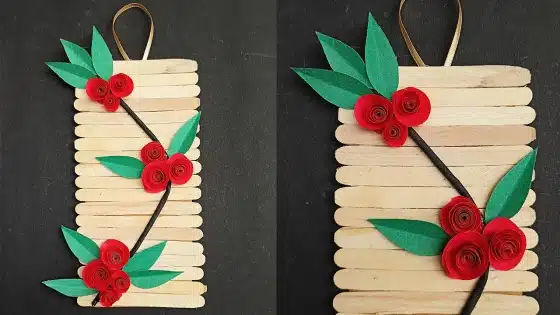
24. Lanterns

Make the frame of the lantern first. To create a square or rectangle, glue popsicle sticks together to make the sides. For various sizes, you may make several frames. Popsicle sticks should be fastened across the bottom and top of the frame to form a closed construction. This will serve as the lantern’s foundation and roof. To fit the apertures on your lantern frame, cut window panels out of vellum paper or colored tissue paper. To add windows, glue these panels to the lantern’s sides. You may add decorations to make your lantern stand out. On the vellum paper, add ornamental elements like glitter, sequins, or even tiny artwork.
25. Windmills

Make the blades of your windmill first. Four popsicle sticks should be glued together like a star, with a tiny space between each stick. Use your creativity to adorn the blades with hues, motifs, or even original designs. This step gives your windmill a unique touch. Attach a tiny square of construction paper or cardstock to the middle of each blade. This will act as the connecting point between your windmill and the base. Create the tower of your windmill by gluing a few popsicle sticks vertically. The top of this structure should be where you attach the blades’ hubs. From cardstock or construction paper, cut out a triangle, then fasten it to a popsicle stick. This will attract wind, which will cause your windmill to turn. Connect this stick to the hub’s rear.
26. Mini Eiffel Tower

Popsicle sticks should be glued together to create a foundation first, that is, either square or rectangular. Your miniature Eiffel Tower will be built on top of this. Glue popsicle sticks vertically on each corner of the foundation to create the tower’s legs. To make the elaborate frame of the Eiffel Tower, affix more popsicle sticks diagonally between the legs.
Attach them firmly using glue. Cut tiny squares of cardstock or construction paper for your observation decks. Attach these squares with glue to the tower frame’s various levels to simulate the observation decks. To construct the iconic form of the Eiffel Tower’s top, gradually thin the popsicle sticks as you go.
27. Hanging Mobile
Choose a concept or theme for your hanging mobile. Nature, space, geometric forms, or anything else that captures your mind might be. Cut out forms that go with your theme from the popsicle sticks. You may draw abstract patterns, animals, stars, planets, and foliage to create your chosen shapes and glue the sticks together. Show off your artistic side! To add appeal, you may paint the sticks, use markers to draw complex designs or attach tiny beads.
28. Fish

An angelfish is just a good idea to make with colorful popsicle sticks or paint them as per the choice. We can make a colorful fish, which will be just fun with colors, and it will help the kids to learn colors as well. You can make it more attractive by creating a water-themed background, and the popsicle sticks can make different sizes of fish by just sticking one on the other.
29. Bird Feeder
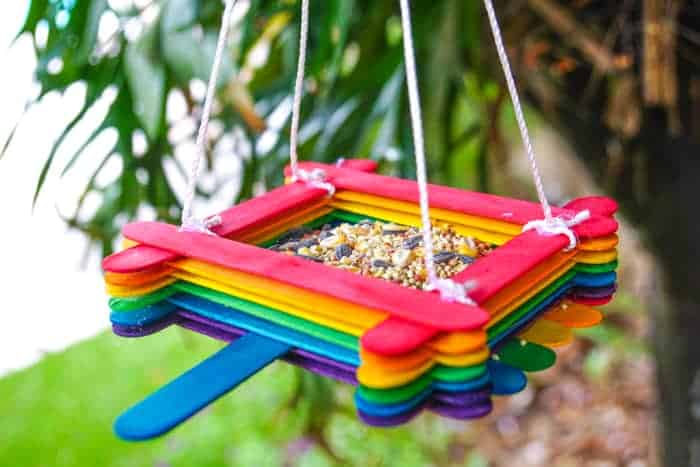
Feeding birds is a satisfactory activity, and doing such things, we need a positive thought. This activity can be done through popsicle sticks, by just making a hollow square with it, and we need to put some food for the birds. Then, it can be dangled on a tree, and we can fill it with grains for birds. To make it more attractive, we can paint it with different colors. You can make these bird feeders in different patterns and glue the sticks together firmly.
30. Bookmarks

Draw some interesting patterns on popsicle sticks and then decorate them with beads, pom poms, etc. We can keep these sticks as a bookmark. At the corner of the stick, we can attach a flower made with ribbon and different patterns made with cardboard, like butterflies, cartoons, etc. These can be gifted to friends as well.
31. Popsicle Stick Sun Craft

Sun is fun. So we can have sun on rainy days as well by having this interesting activity by making sun through popsicle sticks. Cut the cardboard in a circular shape and then paint it with yellow. To add more attractiveness, make eyes and a smile also. Paste the popsicle sticks on the border of the circular cardboard.
32. American Flags

Paint the sticks in white and red color and paste them alternatively in a vertical manner. After that, prepare a small square with the cardboard, paint it blue, and stick it on the top left of the flag. Later, stick a few stars of white color to complete the entire pattern. This will also help evoke a sense of national love among the kids.
33. Rainbow Popsicle Sticks

Enjoy the rain by having this pleasure activity of making the rainbow with colorful popsicle sticks. You need to make a pattern of clouds on cardboard, cut it with the scissors, and then paste the sticks to it. We all feel delighted to have a glance at the rainbow. This activity makes the toddlers learn about the colors in the rainbow.
34. Cactus Plant of Popsicle Sticks
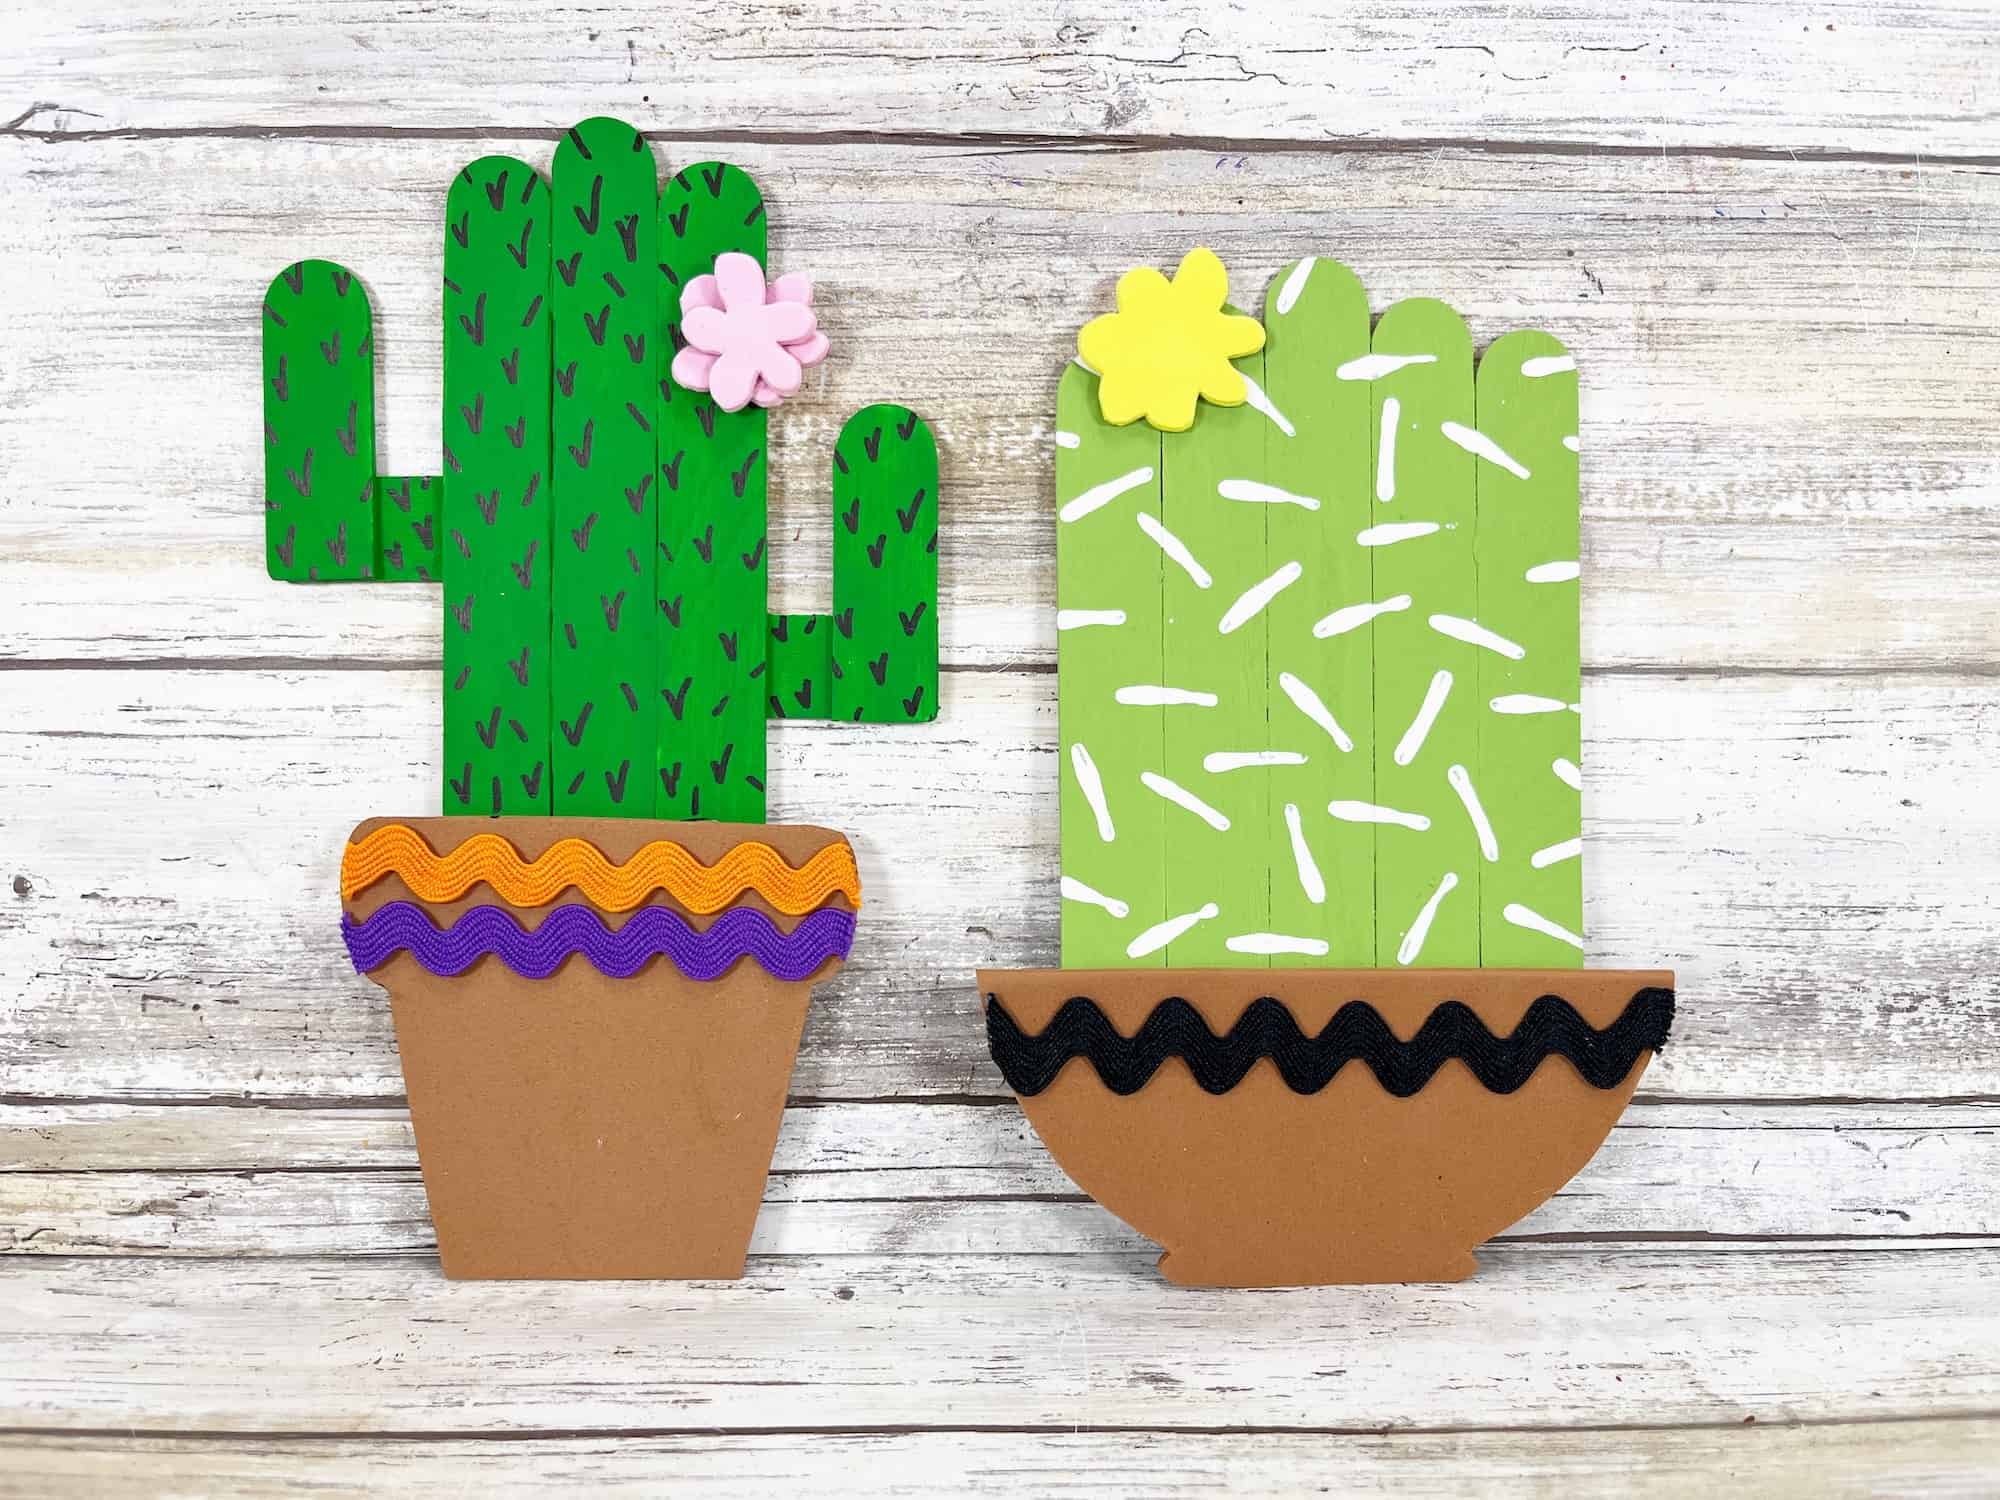
This can be a fun garden activity through which we can make kids learn about the cactus that is found in desert areas. It’s so easy to make through these jumbo craft sticks. To create the cactus, you need to join three sticks side by side through glue and to make the arms of the cactus, cut the stick into half and then paste them on the side borders of the cactus. Now, make a pot by cutting the pattern on a brown color paper. Now, you need to collect all the parts and paste them firmly. Then paint the sticks with green color.
35. Star Wands
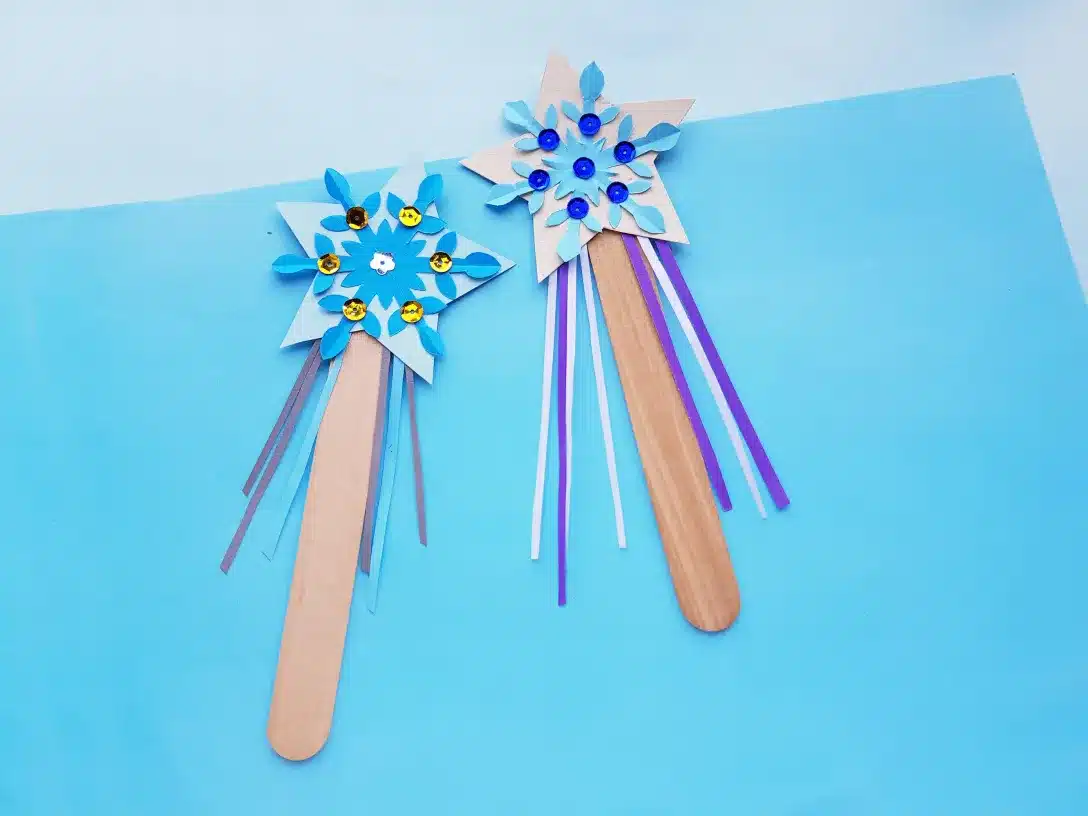
Tinkle Twinkle Little Star, this poem makes the toddler remember the stars. This can be fun as you can make stars easily with these popsicle sticks and add some more extra decoration to make it attractive. You can color the stars of your own choice, and you can paste beads on them. Use five sticks to accomplish the star pattern, and then paste a stick on the back side, and you can add a colorful ribbon to decorate it.
36. Popsicle Stick Puzzle

Create puzzles to make your little ones learn about this brain treasure fun. It’s a frugal activity in which only a few sticks, paint, and markers are required to draw a pattern on the sticks. Firstly, we need to paint the sticks with a light color so that the marker can be visible. Now, after the paint dries, place them in a sequence and draw a pattern, and the puzzle is ready. Now, shuffle those sticks and make your kid solve the puzzle within a fixed timeframe.
37. Alphabets

You can make the alphabetic patterns to make the kids learn. The patterns will create an impression on a kid’s mind for a longer duration. This activity will make them aware of the alphabet before joining the school as well. You can play a quiz activity with your kids, making them feel fun and enjoy along with you. Animals, fruits, and other elements can also be created that can help your kids learn it most efficiently.
Have a Fun Crafting!
The ice cream stick craft is easy and simple and offers a delightful and accessible exposure for creative expression. Especially concerning the kids, these activities must provide them with exposure that would help them foster imagination besides creating elements of their taste.
It is best for kids and people of multiple age groups to create diversified DIY projects that would eventually help beautify their homes.
Moreover, the best part about this craft is its simplicity. It can be shaped with absolute zero expense and just infusing your creativity in the best possible manner.
Hope you liked our carefully curated ideas on the ice cream stick craft. Easy and simple, you may add any experiment if you wish, based on whom you want this to be done by.
There is plenty of other artwork associated with the ice cream we are sure many of you must have tried; let us know your share of experience with this craft and which one of the above you liked the most.
Happy Crafting!